With Dux-Soup Remote Control you can trigger automated LinkedIn actions from any other system that you use for managing your sales and marketing activity. For instance, you can trigger the sending of a personalised connection request to a specific profile in LinkedIn from Hubspot.
Greater visibility and efficiency
Remote Control is a really cool feature of Dux-Soup Turbo, but in this blog we’re taking things one step further by showing you how to build a simple and accessible 'Remote Control Monitor' to keep track of this activity.
The Monitor allows you to quickly check if Remote Control commands that you have sent have been executed successfully - and is easily accessible from your PC or mobile device. This will give you much greater visibility and efficiency in your lead generation automation process.
What else are we covering
In addition to showing you how to create a simple Remote Control Monitor in Google Sheets this blog will also show you how to:
- Distinguish different Remote Control (RC) events
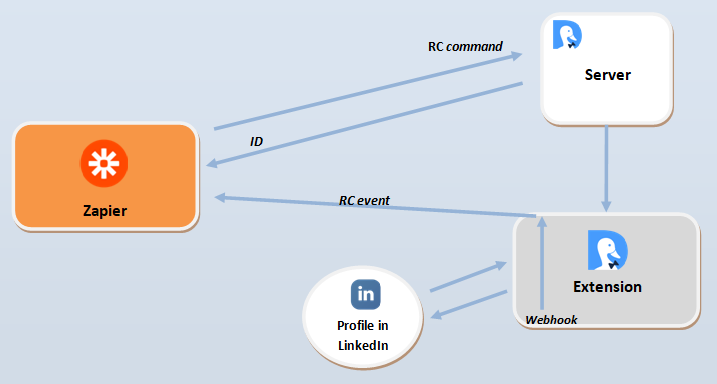
- Understand what happens to an RC command before it reaches Zapier as an RC event (its ‘journey’)
- Visit a profile using Zapier
- Send Remote Control events to Google Sheets using Zapier
Note: You need Dux-Soup Turbo for this to work. If you haven’t tried Turbo yet, remember that we do offer a free 7 day trial.
Remote Control Events
Remote Control Events occur as the Remote Control Robot processes commands. Dux-Soup Turbo processes 5 RC commands:
- received event
- completed event
- snooze event
- ignore event
- error event
You can find more information about different RC commands here.
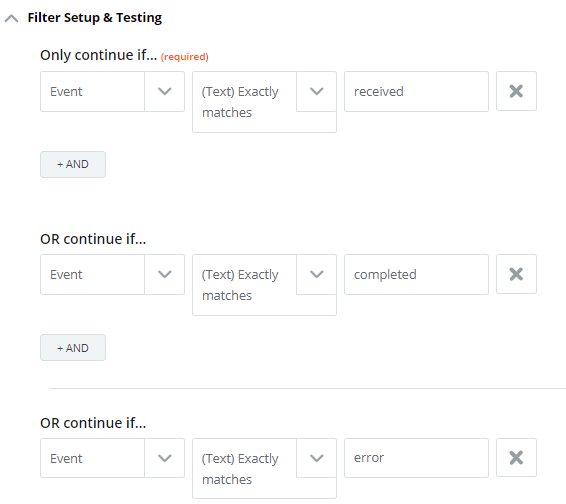
In our Remote Control Monitor, we will record the time when received, completed and error event commands are processed by Dux-Soup Turbo.
To do that, we will set up 2 Zaps: 1 to record timestamps of the RC events that are received when the command is being executed and 1 to record a timestamp when the RC command is queued. We will send this data to Google Sheets so you can access your Remote Control Monitor from any device (cool eh!).
The Remote Control Event ‘journey’
When you enable the Remote Control in Dux-Soup Options → Connect tab, it allows Dux-Soup to process RC commands that are passing through our server and extension. Afterwards, Dux-Soup takes action for the specific LinkedIn profile and sends this data to the Webhook:
Setting up Google Sheets for your Remote Control Monitor
Once you have opened a new Google Spreadsheet to record Dux-Soup Remote Control events, name the columns in the first row:

Send Visit Event Zap
Send Visit Event Zap consists of 3 steps:
1) Trigger App: Webhooks by Zapier
2) Action App: Dux-Soup Remote Control
3) Action App: Create Spreadsheet Row in Google Sheets
1st step: Webhooks by Zapier
1. Go to Zapier and make a new Zap:

2. Select the Trigger app → Webhooks by Zapier and the Trigger event → Catch Hook
3. Retrieve the unique URL provided by Zapier in the following step.
4. Open a LinkedIn profile and copy the profile’s URL.
5. Open a new browser tab and combine the URL from Zapier with the LinkedIn profile URL by inserting ?profile= in between these 2 URLs:

6. Select the hook:

Note: This Zap is for demonstration purposes only. Commonly, the creation of the RC command is part of a different automation. For example, when a new customer record is created in the CRM.
2nd step: Dux-Soup Remote Control
1. Select the Action app → Dux-Soup remote Control and the Action event → Visit Profile:

2. Select your account and customise visit command in the following step:

3. Click on Test & Continue
3rd step: Create Spreadsheet Row in Google Sheets
1. Select Action App → Google Sheets and select an Action Event → Create Spreadsheet Row.
2. Choose your account and customize the Spreadsheet rows:
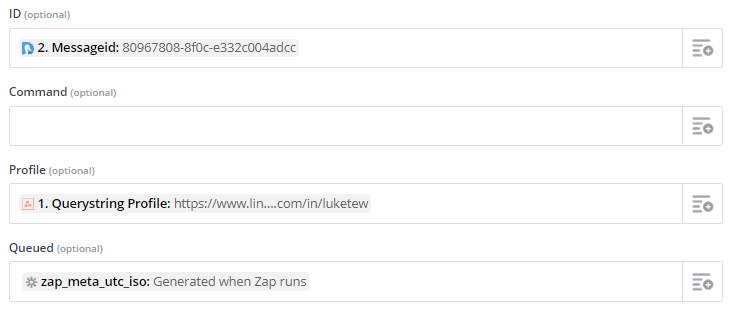
Note: Copy and paste to the “queued” field the following: {{zap_meta_utc_iso}} - this uses the timestamp based upon your user settings/location on your Zapier profile.
3. Send the test data to Google Sheets and turn on your 1st Zap. Your Zap should look like this:

Record RC Events Zap
After you have set up your Google Sheets, head to Zapier and make a new Zap to record RC events.
Record RC Events Zap consists of 5 steps:
1) Trigger App: Webhooks by Zapier
2) Filter by Zapier
3) Code by Zapier
4) Action App: Lookup Spreadsheet Row in Google Sheets
5) Action App: Update Spreadsheet Row in Google Sheets
1st step: Trigger App - Webhooks by Zapier
1. Go to Zapier and make a new Zap:

2. Select the Trigger app → Webhooks by Zapier and the Trigger event → Catch Hook
3. Retrieve the webhook URL and copy it to Dux-Soup Options, Connect tab:

4. Enable the Remote Control option:

5. Open Dux-Soup Remote Control Test tool and select an RC command ‘Visit Profile’:

6. Trigger Error event: close the tab that is opened by Dux-Soup before the action completes. It will take a few minutes to time out.
7. Go back to Zapier and test this event in the following step in Zapier:

8. Select an error hook:

9. Select Test & Continue and add a 2nd Zapier step.
2nd step: Filter by Zapier
1. Select Filter by Zapier as 2nd step
2. Customise the event filters:
3. Click on Test & Continue.
3rd step: Code by Zapier
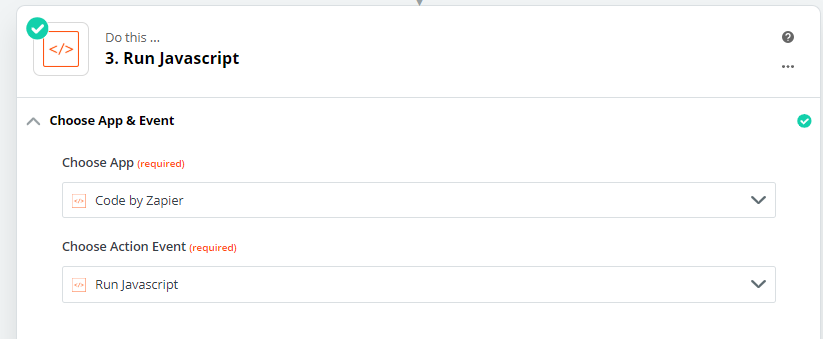
1. Select an Action App Code by Zapier and Action Event Run Javascript:
2. Customise Javascript in the following step:
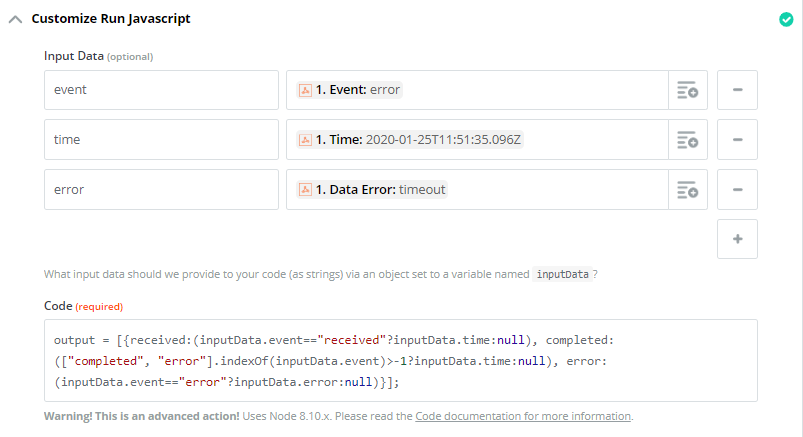
Copy and Paste this code:
output = [{received:(inputData.event=="received"?inputData.time:null), completed:(["completed", "error"].indexOf(inputData.event)>-1?inputData.time:null), error: (inputData.event=="error"?inputData.error:null)}];
3. Click on Test & Continue
4th step: Lookup Spreadsheet Row in Google Sheets
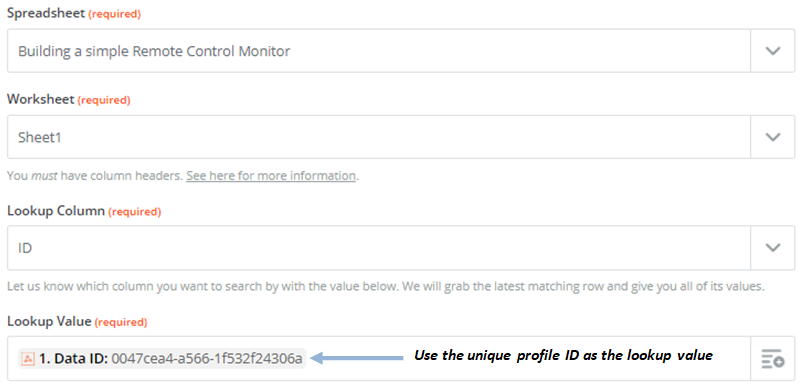
1. Select an Action App → Google Sheets and select an Action Event → Lookup Spreadsheet Row
2. Choose your account and customize the Spreadsheet row:
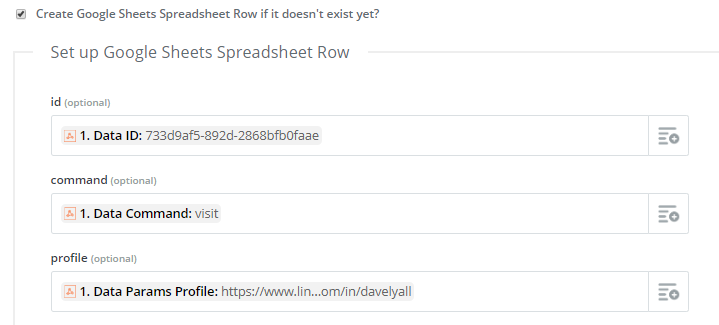
3. Tick “Create Google Sheets Spreadsheet Row if it doesn’t exist yet?” and update columns A-C:
4. Send the test data to your Spreadsheet and click on Test & Continue
5th step: Update Spreadsheet Row in Google Sheets
1. Zapier Action App → Google Sheets and select an Action Event → Update Spreadsheet Row.
2. Choose your account and customise the Spreadsheet row:
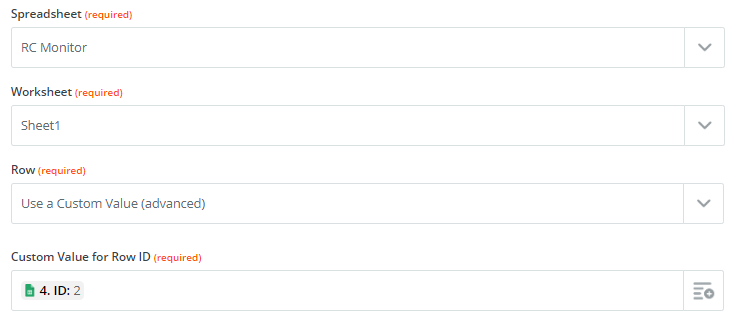

Note: We are updating all 3 columns in this step, that is why we use the current value of the cell and the value from code output.
3. Send the test data to Google Sheets and turn on your 2nd Zap. Your Zap should look like this:

Result
And there you are! You’re all set up and ready to monitor your Remote Control Events in Google Sheets. Try it out by triggering the “visit” Zap, and see how the sheet is updated as the command is executed.:

Join our webinar to learn more
See the Remote Control Monitor set up in real-time by registering for our free webinar here. Plus loads of opportunity for Q&A!
NOTE: If you’re reading this after February 4th, 2020 then you can watch a recording of the webinar here: https://www.dux-soup.com/webinars#past-webinars
If you have any further questions, feel free to contact Dux-Soup Support at info@dux-soup.com to send us your comments, suggestions or feedback. We always love hearing from you!


