LinkedIn Sales Navigator has become a favorite tool for sales professionals and teams looking to generate leads for their sales funnel. It remains largely unchallenged as the most comprehensive social networking platform for B2B professionals and is regularly granted a spot in companies' sales and marketing tech stacks.
Sales Navigator can connect to your CRM, allowing you to import LinkedIn data, activity history and sales leads into your CRM system for centralized management of accounts and profiles. Here at Dux-Soup, we love Sales Navigator for its ability to feed some of the most accurate B2B data into your lead generation campaigns. Using just 3 tools you can accelerate your sales pipeline and automate your outreach process:
- Sales Navigator (for data)
- Dux-Soup (to automate LinkedIn outreach)
- CRM system (to store your contact data and history)
If you’re unsure whether Sales Navigator is the right plan for you, you can compare LinkedIn’s Premium Plans and make your decision. But if you’re in a sales, marketing, or business development role, then chances are it is.
One of the best things about Sales Navigator is that you can build excellent, accurate target lists with it. Then, connect it to Dux-Soup and automate your LinkedIn lead generation outreach.
Why not get Dux-Soup’s free trial, and Sales Navigator’s free trial and give it a go?
In this article, we'll show you how to use Sales Navigator and introduce how to best use it for outreach to generate leads, scaling that process accurately and efficiently.
How to access Sales Navigator
From LinkedIn.com, you’ll see your Sales Nav icon at the top right of your toolbar. Click on this to get to Sales Navigator. You’ll only see the Sales Nav icon appear if you have a Sales Navigator subscription.

You’ll be taken to the home page. Because Sales Nav is a lead generation platform, you’ll notice the menu is quite simple.

Across the top, you can go into your saved Accounts (companies), Leads (individual profiles) and Messages. Underneath this, you have a search bar. That’s where you can search for profiles, and we’ll come onto that.
Saved Accounts
With Sales Navigator, you can save Accounts or Leads (individual profiles). The Accounts features are great if you sell large-value products or services and there are multiple decision-makers and influencers involved in the purchasing decision. Or, if you can cross-sell to multiple people within a business, for example with software licensing.
Whenever you save an Account, it will appear under your ‘Accounts’ tab.
You can organize your saved Accounts into lists, which is great if you’re either an agency building Account lists and Account mapping for different clients or if you’re building campaign-specific Account lists for your company.
Let’s view your different Account lists by clicking on the drop-down arrow next to ‘Account list’.

Here you can see there are 183 saved Accounts, and there are some lists:
- My Current Accounts
- TrustQuay clients
- Event Production
Adding Accounts to Account Lists
If you want to add more Accounts to existing Account lists, let’s start by finding an Account. You can use the search bar for this, and when you find an Account you want to add to a list, click ‘save’ next to the Account, and select the desired list.
You can also bulk-select Accounts by checking the box at the top of the page and adding them all to your list in one go.

If you want to add Accounts to a new list, select the Accounts and then press save, choosing to ‘Create new list’ from your drop-down Account lists.
Removing Accounts from Account Lists
When you are in an Account list, you can remove or bulk-remove Accounts by selecting them and then clicking on the trash can to ‘Remove from list’.

More Account List Actions
You can run more actions against Account lists including sharing, copying, editing and deleting Account lists. To do this, first click on ‘see account lists’.

From this screen, you can search for any Account across your saved Accounts, create a new Account list, make a copy of individual lists, or drill down into a list.

Once you are in an Account list, the option to delete it also appears.

Using Sales Navigator for Account-Based Sales & Marketing
Sales Navigator is one of the best tools for account-based sales and marketing. Account lists are a great tool here; we love these features:
1. Intelligence on Accounts with recent changes
Sales Navigator will highlight recent changes to your saved Accounts. For example, here we can see that Baker Tilly employees are moving to Deloitte at a faster-than-normal rate. Insights such as these give you great intelligence about what’s happening in your markets and allow you to adapt your outreach messaging to demonstrate your expertise in relevant topics.

Keeping an eye on changes within your target accounts gives you a reason to engage with target profiles to nurture a relationship.
2. Account mapping with Sales Navigator
For each account you save in Sales Navigator you can create an Account map containing up to 30 profiles. The great thing here is that you can build out the relationship between the profiles in an easy-to-navigate organizational chart so you have a clear picture of who your key stakeholders are.
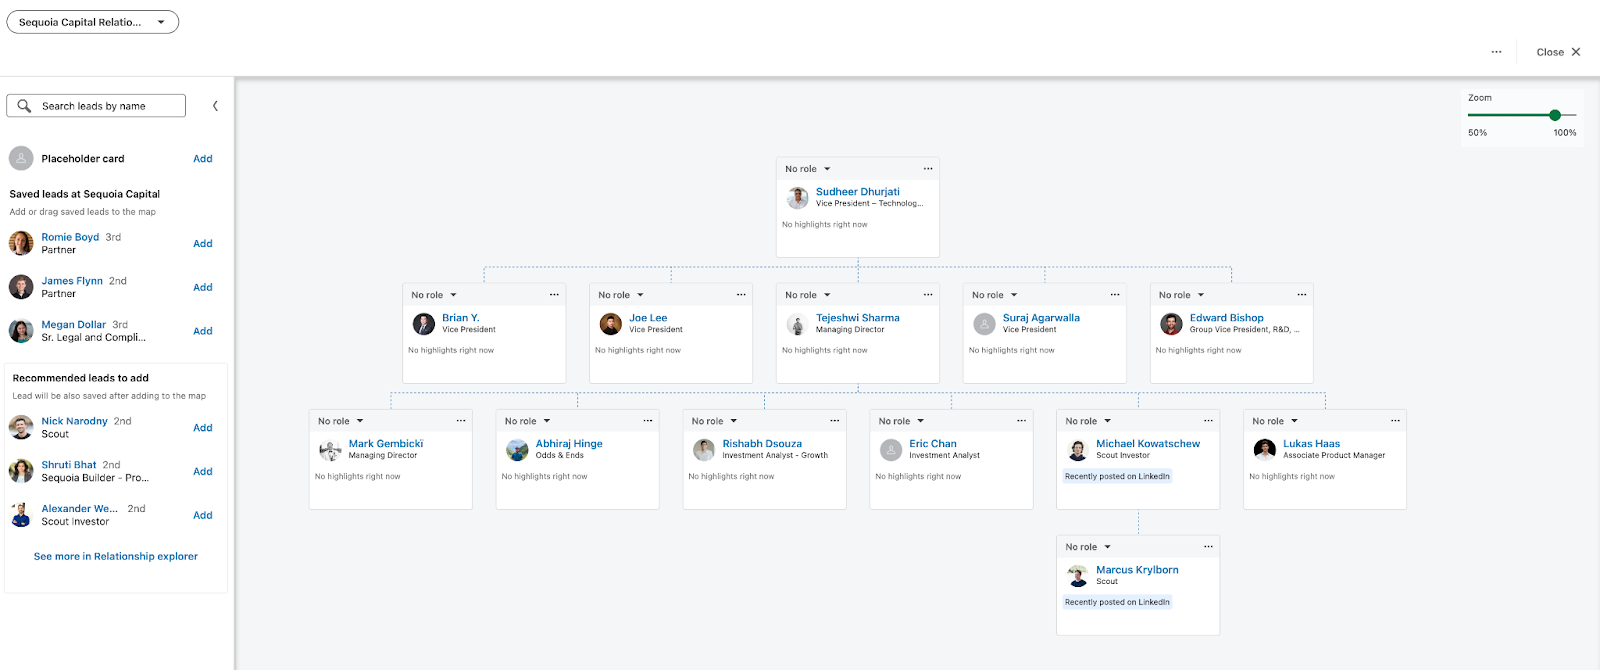
And if you want more than 30 profiles in your account map? Just create another one and break the Account down into smaller segments - by department, location, or something else.
3. Personas
If you typically target a certain function or decision maker, you can set up a Persona in Sales Navigator. In fact, you can create up to 5 Personas by clicking on ‘Personas’ next to the search bar.

And then edit each persona based on Function, Seniority, Job Title and Geography.

Once you’ve created a Persona, you can use it when creating lists of target accounts as we see below.
4. Sales Navigator profile recommendations in your Saved Accounts
Sales Navigator will recommend profiles within your target Accounts using your Persona lists.
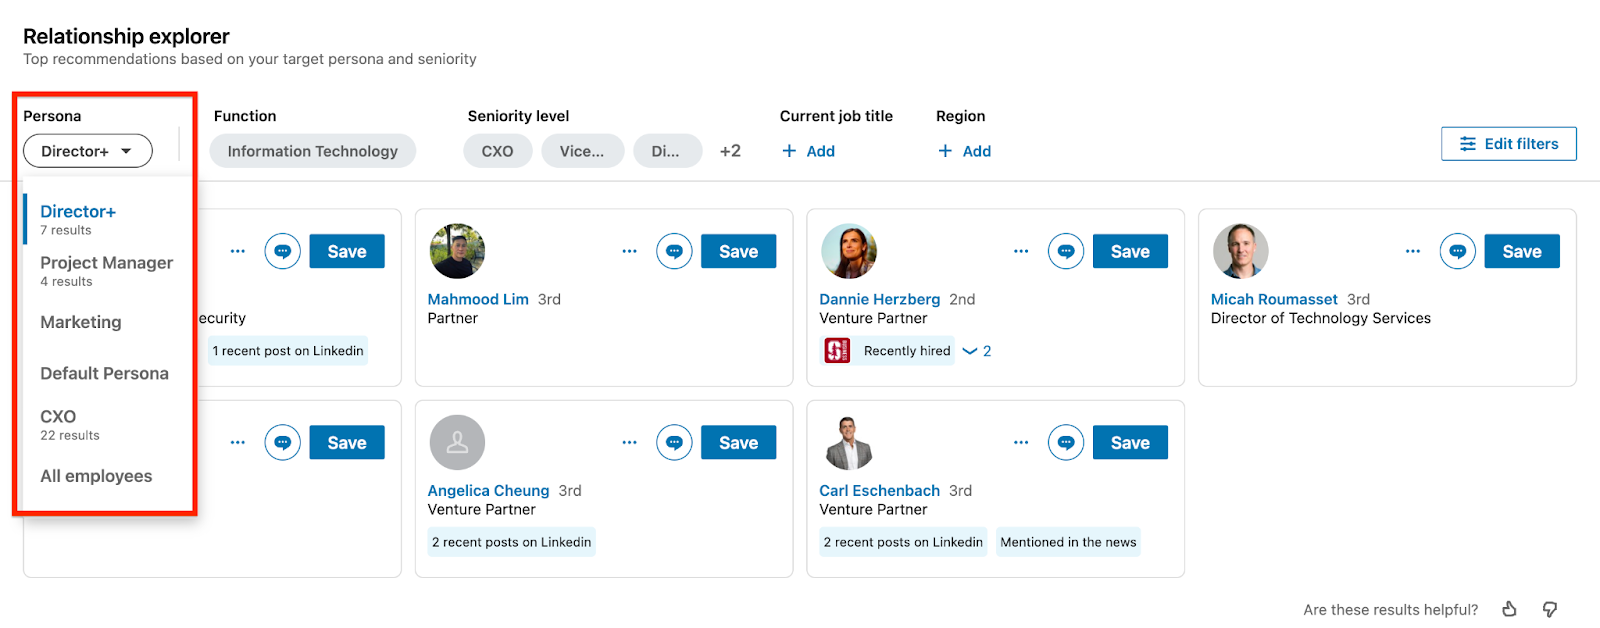
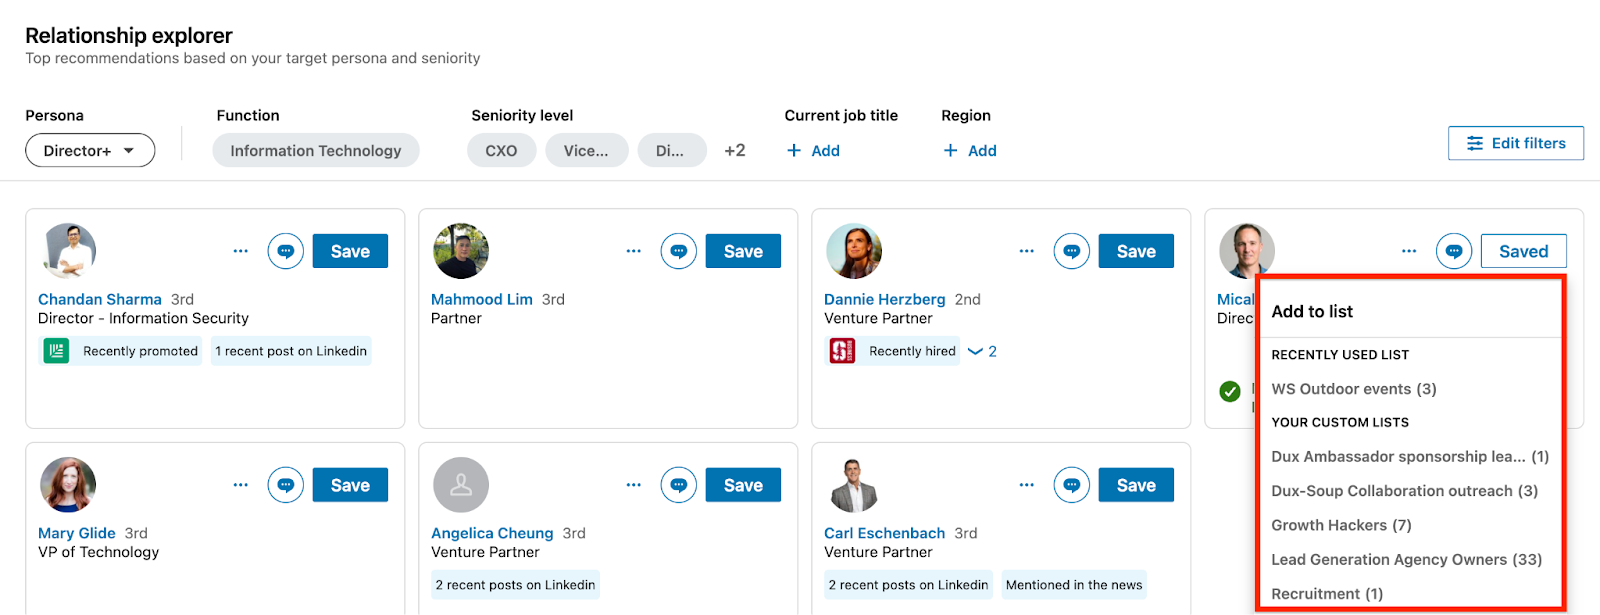
You can quickly save these contacts by clicking on the ‘Save’ button. This will open up a drop-down list of your Lead lists.
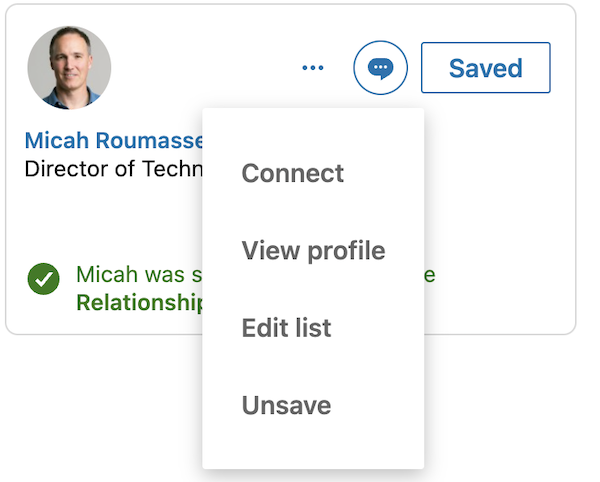
You also have the option to carry out more actions here including viewing the profile and sending a connection invitation.
Later, we’ll show you how to automate the connection process, so let’s just save target profiles to lists in Sales Nav for now.
Saved Leads
In a similar way to saving Accounts, you can save Leads. Remember, Leads are LinkedIn profiles, whereas Accounts are LinkedIn companies. You can save up to 10,000 profiles to your leads lists with Sales Navigator.
If you click on ‘Leads’ on your main Sales Navigator menu, you’ll see your Lead lists.
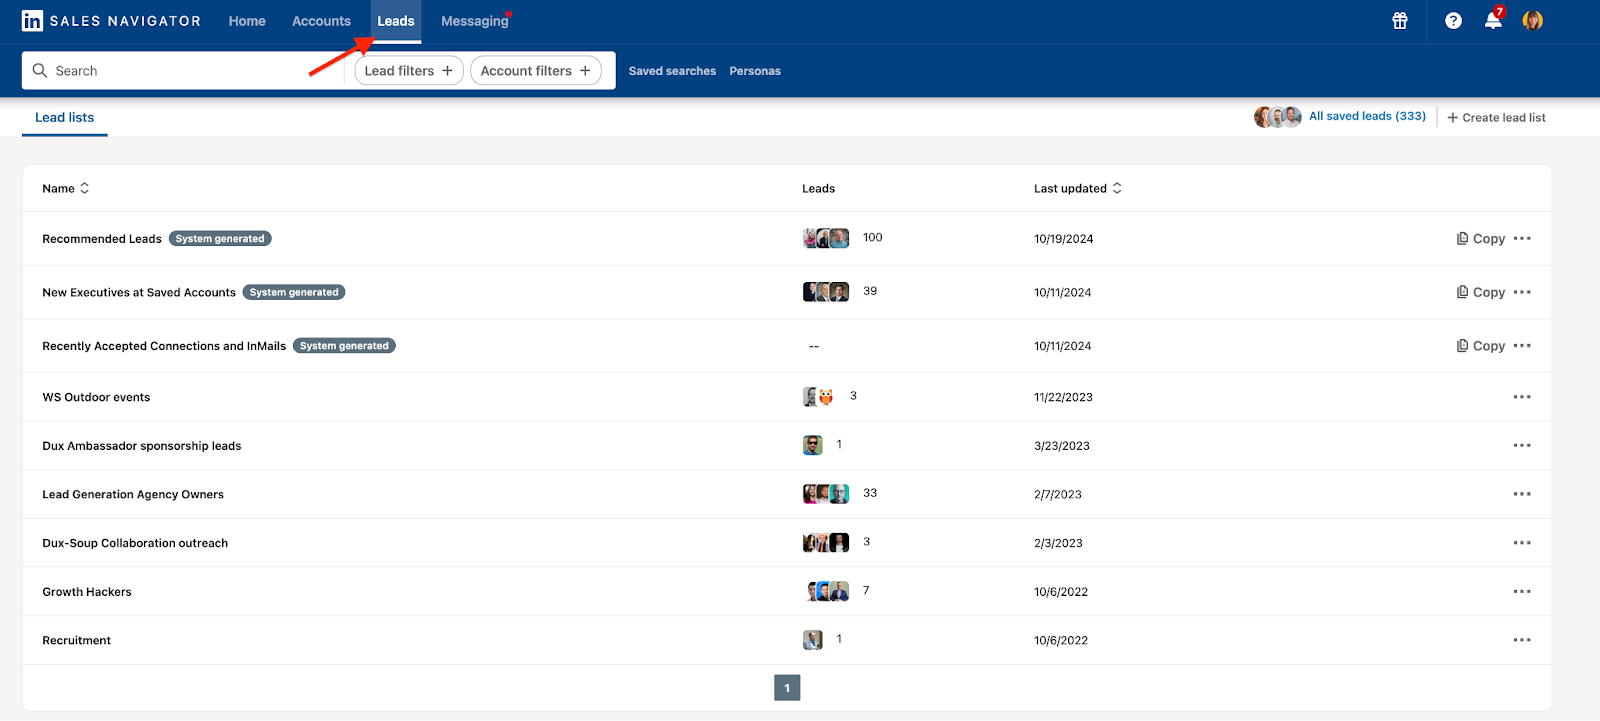
Sales Navigator generates some lead lists automatically for you, using previous searches:
- Recommended Leads - List of recommended leads based on your past activity and buyer interest signals refreshed every week
- New executives at Saved Accounts - New Executives who joined a new company in your saved accounts in the past 3 months. Refreshed every week.
- Recently connected invitations and InMails - Warm leads to consider following up with as they recently accepted your LinkedIn connection requests or InMail in the past 30 days. Refreshed four times a week.
With the last list, it’s preferable to automatically schedule follow-ups to our accepted connections using Dux-Soup. This is because we can schedule the follow-up to automatically send at a specific time delay after the acceptance. It gives you better control and consistency over your LinkedIn follow-up process.
Creating a new Sales Navigator Lead List
To create a new list, you can either:
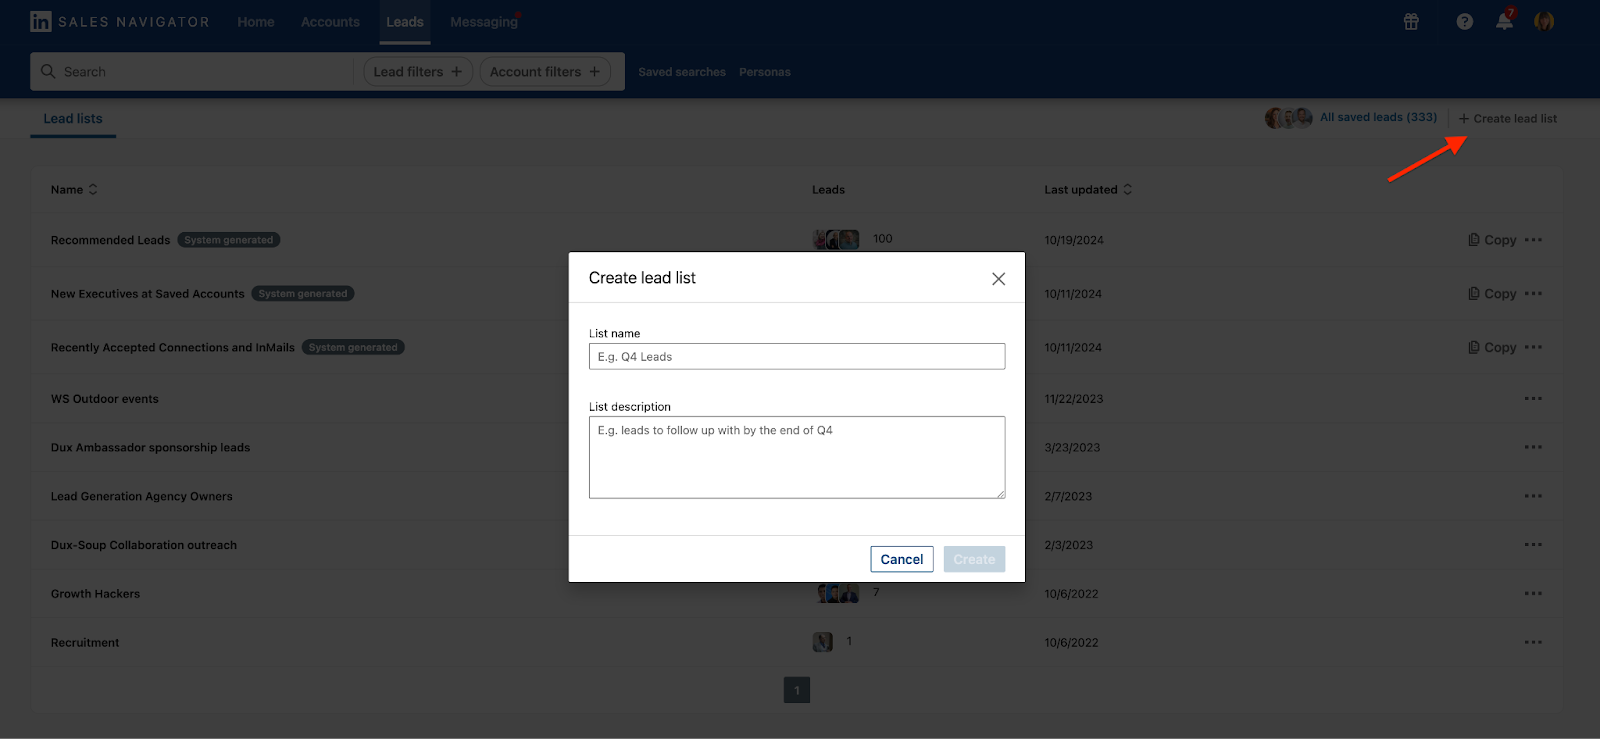
1. Click on the ‘+ Create lead list’ button at the top of this page. A box will pop up to add a Name and description for your lead list.
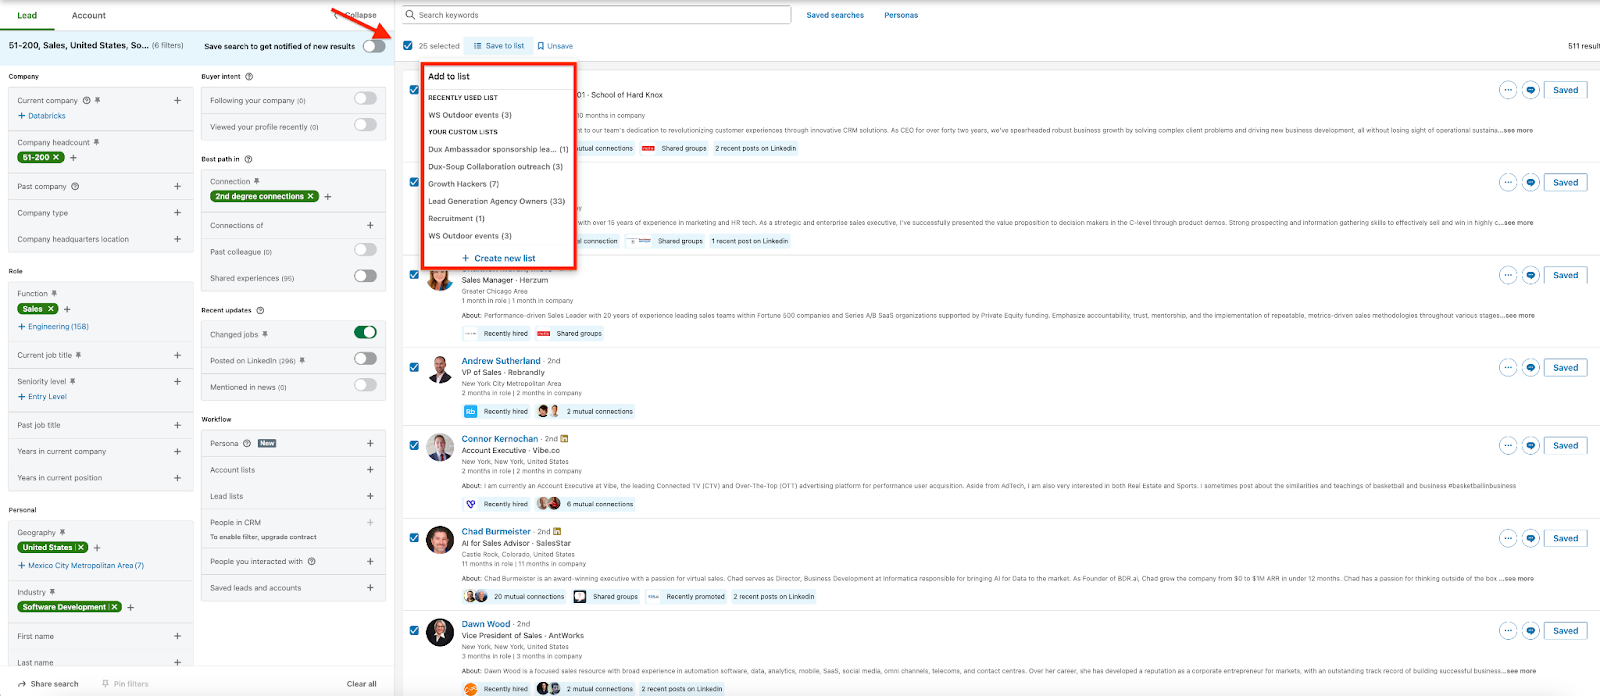
2. Create a lead list and add to it directly from your Lead search list.
Sales Navigator Lead Search
Sales Navigator offers excellent search capability. With over 1 billion profiles available on LinkedIn, it’s important to search effectively in Sales Navigator.
Search Navigator offers 34 search filters. To start a search, click on ‘Lead filters’ in the search bar at the top of your screen.

You’ll now be able to access the full set of search filters. You can toggle between Lead and Account search filters too.
There are some really nice filters you can use here, like checking those who have recently changed jobs, or posted on LinkedIn.
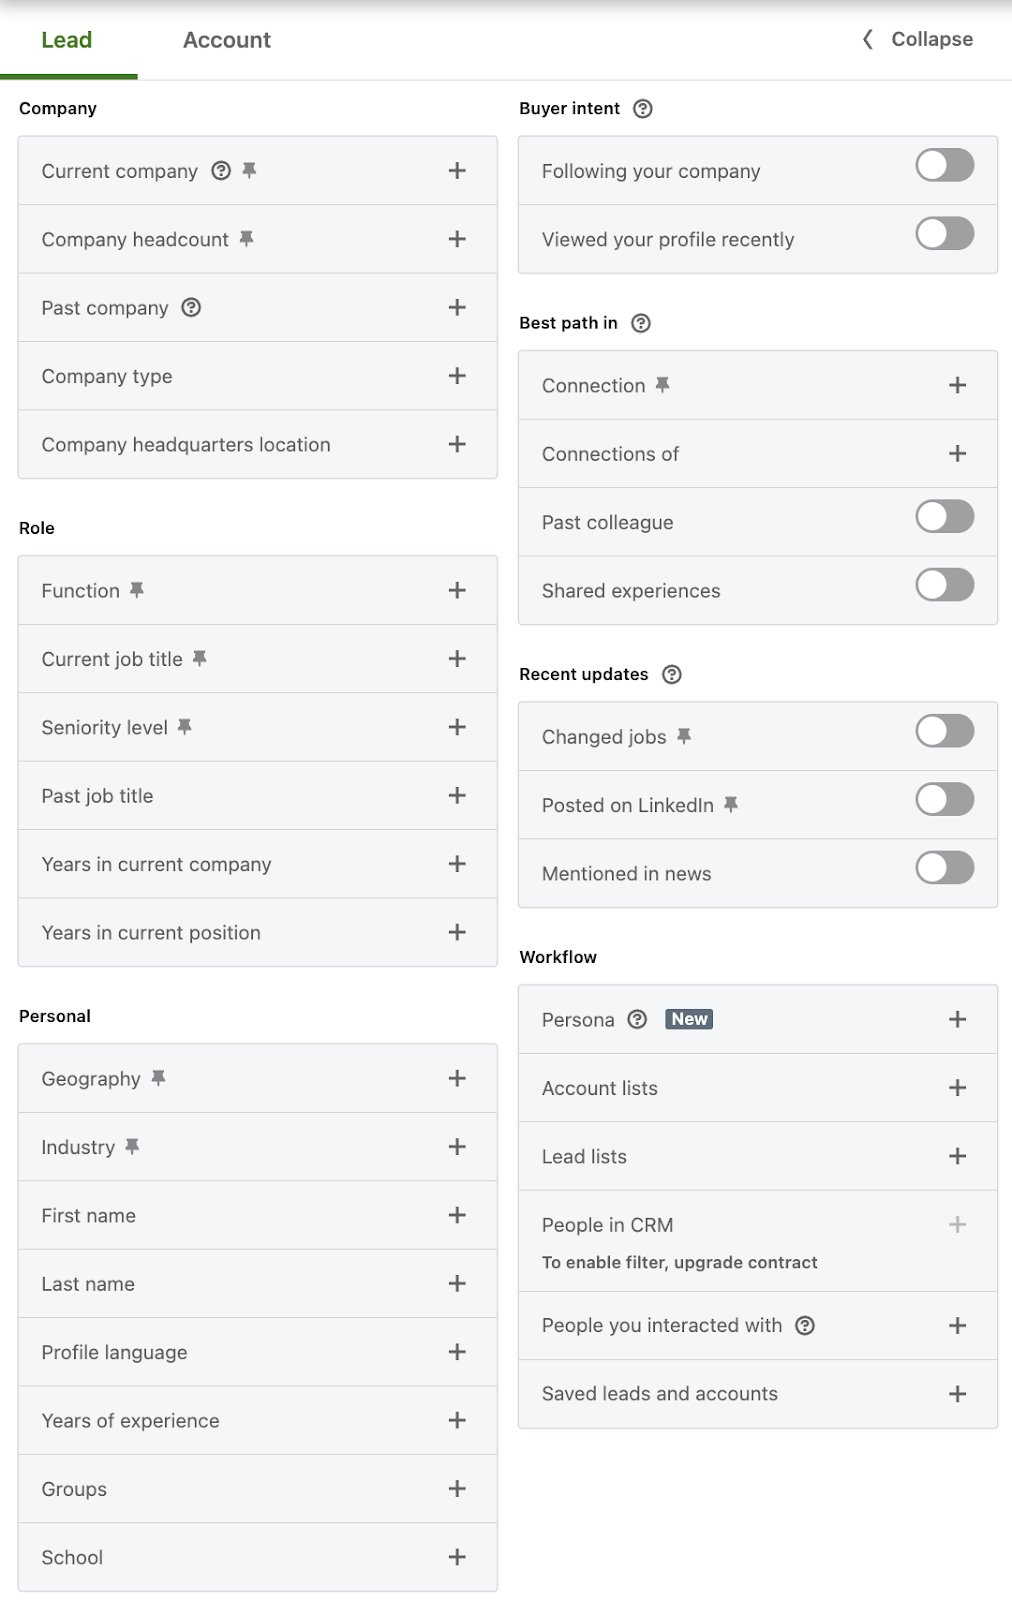
We won’t deep dive into the search and filter capabilities of Sales Nav here, but it’s all covered in our LinkedIn search and filter masterclass where you can learn about Boolean and Regex searches, as well as how to search in Groups to build your perfect list.
Once you’ve got your Lead list, you can select individual or multiple profiles and add them to an existing or new Lead list.
Lead generation with Sales Navigator
Now that we know how to find great Accounts and Leads in Sales Navigator to target, what next?
It's time to move onto the lead generation, or ‘outreach’ stage. This can be broken down into the following steps:
- Connecting with your Leads. When someone accepts your connection request, they become a part of your network - or a ‘1st degree’ connection. We can now send them direct messages for free, which land straight into their LinkedIn inbox. The connection stage is perhaps THE most important part of your lead generation strategy. If you can’t make a connection, you only have the option to InMail prospects to reach their inbox.
- Outreach. Your outreach strategy will consist of different LinkedIn actions designed to achieve a specific outcome. It may be that you want to invite people to an event, or schedule a meeting, or register them for a webinar. Your outreach strategy can be as simple as a single message, or a more complex multi-action approach. You can either run your LinkedIn manually, or via a streamlined automated process.
What’s important is that LinkedIn outreach always starts from your lists. Let’s give you an example:
I’ve saved 100 contacts to a list that have changed jobs within the past 90 days. All 2nd-degree connections in a Sales Function within Software Development companies that have 51-200 employees in the USA.
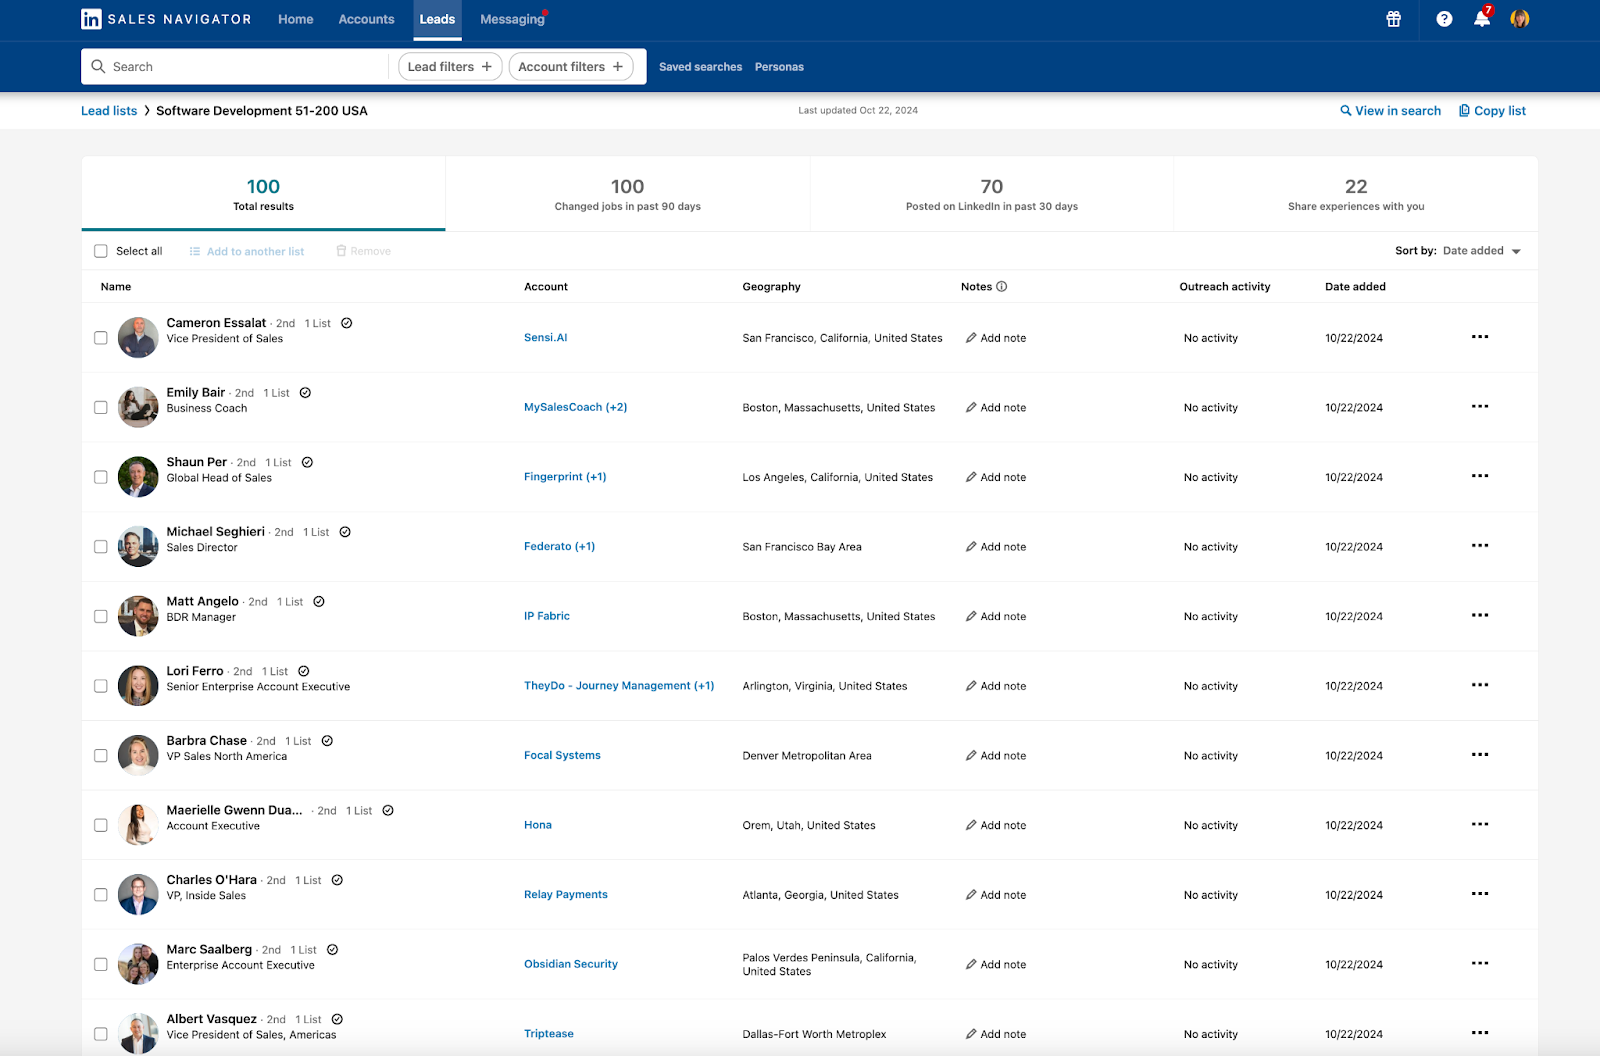
I can now run an outreach campaign to them. I want my campaign to consist of:
1. A connection invitation
2. A follow-up message to invite them to a webinar
3. A follow-up reminder of the webinar
There are a few ways of doing this:
- You can click on the 3 dots and then click on ‘Connect’. With Sales Navigator you can personalize your connection invitations, so it may look like this:
“Hi [Name], We have some mutual connections. How’s it going at [Company Name] - I see you’ve recently changed jobs. It’d be great to have you in my network.”
- Build a second list, similar to the first list, but where you see the Lead Lists - choose to include ‘Recently Accepted Connections’. This will pull up the same list but include people who have accepted your initial connection invitation.

- We can now send them a message, e.g.
“[Name], great to have you in my network. We have a webinar coming up on how mid-sized Software Development companies can grow their pipelines by 50%, including tools, techniques, and strategies that are working really well for the market. I thought it could be useful so here’s the link to join [URL].”
- If we want to send a reminder out, then we can either use the sale list, or we can go into our ‘Messages’ in Sales Navigator and send a follow-up reminder from there.
There are many different campaign styles you could adopt with Sales Navigator, and we’ll share some useful resources on campaign techniques later on.
What you may be thinking is that this is all rather time-consuming, and can get a bit messy. And you’d be right, LinkedIn outreach can take considerable time, mistakes can be made, delays can become too long between messages, etc. So what’s the alternative? We can use Dux-Soup to automate the entire outreach campaign process.
You can follow along with our free trial.
Automating Sales Navigator Outreach
The lead generation process outlined in our example above can be fully automated with Dux-Soup Turbo or Cloud plans (also with our free trial which is a 2-week all-inclusive Turbo trial) using the Drip Campaigns feature.
Here’s how you would set up a campaign:

The biggest benefit of automating your LinkedIn outreach campaigns is that Dux-Soup will manage the personalization elements and time delays for you, so you never miss a follow-up. By automating a sequence of actions, your outreach will be consistent, and also accurate.
In fact, you can automate up to 12 actions in your campaigns - including profile follow, visit, connection invitation, message and InMail. Campaigns can be run over weeks or months, and as soon as someone responds? They automatically drop out of the campaign and into your Sales Navigator inbox for you to convert.
Before you start worrying too much about how you’re going to use all 12 actions, let’s practice with a simple approach. Often a connection request and 1 or two messages are enough to start a conversation, as we have done in the campaign example shown above. Then all you have to do is enroll your Leads into your outreach campaign. It's important to note that you can only enroll Leads into campaigns, not Accounts. So you need to work from a Lead list, and then simply click 'Enroll' on your Dux-Soup extension.
Once you’ve mastered this simple process, you can use our LinkedIn automation playbook to advance your skills with more campaign actions, A/B testing, and exporting your data to use it for email outreach.
Why LinkedIn automation with Sales Navigator?
You may be asking why you need 2 tools for lead generation and why you can’t use Sales Navigator alone. What’s important to note is that Sales Navigator’s main value is from these features:
- Access to its vast database of over 1 billion profiles globally
- The ability to send personalized connection requests. LinkedIn’s weekly invitation limits allow Sales Navigator users to send up to 250 per week, and Regular LinkedIn users up to 100 per week. But with Sales Navigator, you can personalize all of your connection invitations whereas with Regular LinkedIn you can only personalize 5 each month. Remember how important it is to get someone to accept your connection invitation?
- The ability to scale activity. See 2500 search results per search and get unlimited profile views, plus send up to 250 connection invitations a week, without LinkedIn limiting your activity.
- Better search. With its additional search filters, Sales Navigator allows you to build more targeted lists. This in turn allows you to make your messaging more relevant, increasing connection and response rates. It’s a win-win.
- 50 free InMails a month (although with our InMail hacks you can send unlimited InMails to Open Profiles).
What Sales Navigator won’t do is organize your outreach and manage it for you. That’s where Dux-Soup comes in, the main value of which is from these features:
- Automating your campaign actions for you, to run your actions at a scheduled time delay after the previous action
- Personalizing your messages and connection invitations - ensuring no typos or copy-and-paste mistakes are made
- Skipping profiles that don’t meet criteria e.g. blacklisted, those with too few connections or no profile photo
- Scaling your outreach efforts, working for you 24/7 so you can put your time into following up leads
So now you can see the power of Sales Navigator and Dux-Soup together, let’s introduce the 3rd tool - a CRM system.
Managing your leads with a CRM system
A CRM system will allow your business to centrally keep a 360-degree view of every Account or Lead you’ve targeted, spoken to, or moved into your pipeline. Because Sales Navigator accounts are linked to the profile, businesses can spend a lot of money on subscriptions and never be able to access the activity or conversations held within the platform.
This is where integrating your Sales Navigator account with your CRM comes in handy. And Dux-Soup gives you an easy solution.
With our integrations, you can connect Sales Navigator to Hubspot, Pipedrive, SharpSpring, and Freshsales so that data from LinkedIn flows into your CRM system.
Automatically update records when new connections are made, when a profile is visited, or when a message is received. You can also enroll profiles from your CRM system into a LinkedIn outreach campaign.
Other third-party systems can also be connected to Sales Navigator by using Dux-Soup with Zapier. You can read up on how to integrate LinkedIn to your CRM system with Dux-Soup and our technical team is on hand to discuss any third-party integrations with you and can be reached at info@dux-soup.com
Summary
Sales Navigator is best used by sales professionals and businesses looking to scale their pipeline and win new clients. Its advanced search capability and increased activity levels over a regular LinkedIn account allows you to drive a sustainable source of leads into your business.
But for seamless and scalable outreach, combining Sales Navigator with Dux-Soup and a CRM system allows you to build an automated lead generation machine that is self-perpetuating.
Further reading:
Dux-Soup and LinkedIn Sales Navigator
The tech stack that drive $175 in C-Level sales with a single LinkedIn campaign
How to generate more leads on LinkedIn
10 best practices to put your LinkedIn lead generation on autopilot


