Updated June 2024
Dux-Soup and LinkedIn Sales Navigator
With over 1 billion users, LinkedIn is a popular and effective place to connect with prospects and discover new leads. And with 16% of these users being active on LinkedIn every single day, there’s plenty of opportunity to be networking with your ideal prospects.
What is Dux-Soup?
Dux-Soup is a LinkedIn automation tool, that can manage and execute your LinkedIn actions for you, saving you up to 80% of the time spent on LinkedIn if you were to run these actions manually. Think of it like an email marketing tool, except that instead of sending emails, it sends messages on LinkedIn. Now you wouldn't send your marketing emails one by one when prospecting, would you? So why send your LinkedIn connection invitations and messages one by one when there's a better way of doing it?
In fact, Dux-Soup does a lot more than send messages on LinkedIn. It can automate lead generation campaigns with up to 12 actions (including profile visit, follow, endorse, send connection invitation, send InMail and send direct message), plus you can tag LinkedIn profiles for better targeting, extract email addresses, analyze your campaign data, A/B test your outreach and connect it to third party systems like Hubspot, Pipedrive, Woodpecker, Zapier etc for integrated multi-channel outreach.
The best way to get a feel of the power of Dux-Soup is to give it a try - you can access 2 weeks of Turbo for free at the link below.
Because Dux-Soup works directly on your LinkedIn account, you'll need to have one of these too. And if you're serious about your lead generation activities, then we recommend Sales Navigator.
Why choose Sales Navigator?
Sales Navigator is a Premium LinkedIn plan that assists professionals in finding, engaging and building relationships with potential customers. It offers some distinct advantages for lead generation over a regular (free) LinkedIn account:
- Enhanced search filters
- InMails
- Lead lists and auto-generated lead recommendations
- Team collaboration
- Scale
Here at Dux-Soup, we think that one of the top benefits of Sales Navigator is its advanced search capability, allowing you to create highly targeted lead lists from its additional search filters. This feature alone has enabled our users to get response rates as high as 80%! Check out our article: How to use LinkedIn Sales Navigator.
Add to that the increased volume of activity Sales Navigator allows, its InMail capabilities, lead lists (and auto-populated leads lists) and team collaboration possibilities, and Sales Navigator is a great choice for those looking to step up their B2B lead generation game.
When we talk about 'volume of activity', this is important. LinkedIn continues to restrict the volume of activities you can perform with a free account. So if you're serious about lead generation then we really do urge you to upgrade to a paid plan, preferably Sales Navigator. We regularly update these two articles on the subject of LinkedIn limits:
What is the LinkedIn weekly invitation limit?
Using LinkedIn automation safely
Top tip: If you’re undecided as to whether you need a Sales Navigator account or not, we suggest thinking about how much you use LinkedIn. Regular LinkedIn will limit how many profiles you can view, how many searches you can run and how many connection requests you can send each month. If you’re using LinkedIn automation for lead generation, then you’ll probably want to opt for Sales Navigator to gain full advantage of your LinkedIn automation tool.
Dux-Soup & Sales Navigator
When combined with Sales Navigator, Dux-Soup can make your lead generation even more powerful. By automating the outreach, connection and initial engagement process - you’ll fill your pipeline faster, and win more customers with ease.
From a technical point of view, Dux-Soup works with Sales Navigator the same way it does with a free LinkedIn account. However, in this blog, we’ll show you some awesome additional features that are enabled in Dux-Soup if you have Sales Navigator - such as accessing extra lead filters, sending InMails and saving profiles as a lead.
If you're not already a Dux-Soup user, start your free Turbo trial which gives you access to ALL of the features that we cover in this blog.
Additional Sales Navigator lead filters
LinkedIn contact data is structured in a format that allows you to specify search terms for specific fields. Sales Navigator offers more search filters than Regular LinkedIn which is great for lead generation. We recommend that you:
- Make use of as many of the extra search criteria offered by Sales Navigator as possible
- Use boolean search terms in your keywords
The more targeted your list, the greater your chance of success. So going after smaller lists of, say, 2,500 results with get you better results that targeting tens of thousands.
Staying targeted also helps to keep your LinkedIn account safe. A scattergun approach to your LinkedIn outreach could result in more people rejecting your connection invitations, stating ‘I don’t know this person’ which isn't great for your conversion results, or account safety.
The good news is, Sales Navigator’s advanced search filters allow you to define your audience for a more targeted approach, boosting connection acceptance and response rates.
How to search and filter with Sales Navigator
To begin a search in Sales Navigator, enter your keyword into the Search bar and select “search for leads”. You can use Boolean search terms in your keywords here to be more specific.
You can also go straight to the “All filters” section:

In addition to the regular LinkedIn filters, you can apply the following filters in Sales Navigator:
- Lead Lists
- Past Lead and Account Activity
- Role & tenure filters, like seniority level, function, years of experience, etc.
- Company filters such as company headcount and company type
- People that have changed jobs within the past 90 days and other recent updates
- Other filters such as LinkedIn Groups, posted content keywords, etc.
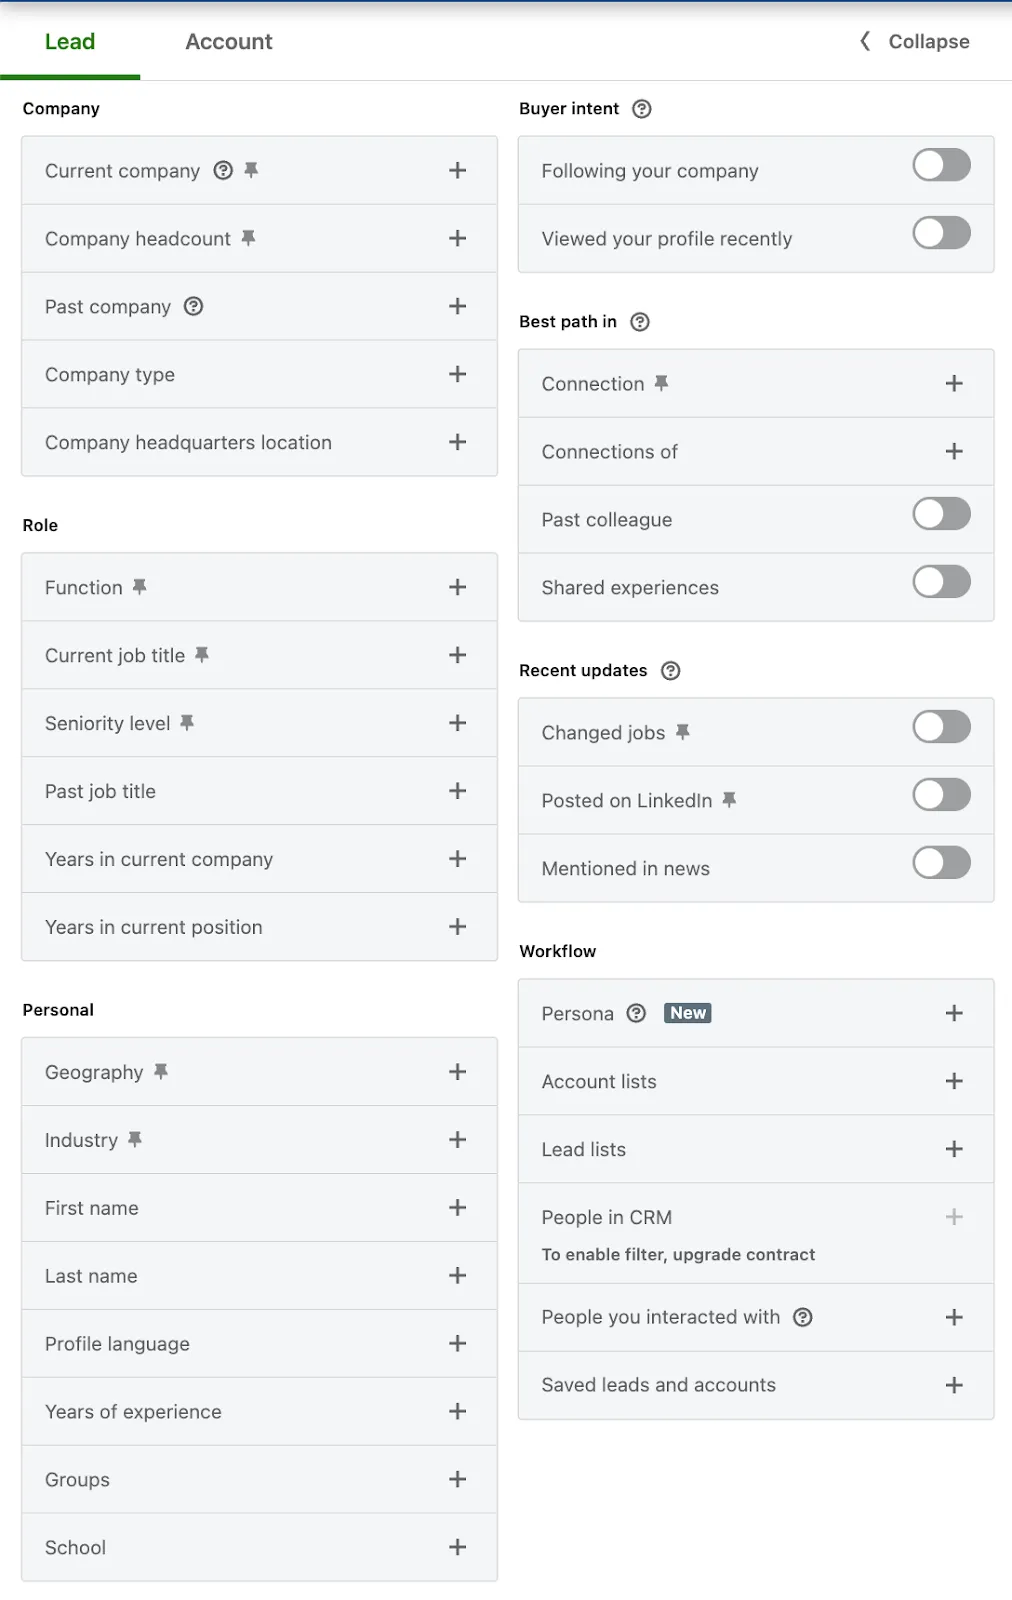
These additional search filters can save you valuable time as they will help you to target the most relevant connections. You can also pin your preferred filters so they are easily accessible for any search.
For further reading, check out our LinkedIn Search and Filtering Masterclass.
Another benefit of Sales Navigator is that you can view up to 2500 profiles per search compared to only 1000 search results in Regular LinkedIn, so you can increase your outreach volume.
Automating LinkedIn actions
Once you have your targeted list ready, it's time to set Dux-Soup to work, automating your outreach activity. This is done by clicking on the Dux-Soup extension on your toolbar.
Here, depending on whether you have Pro, Turbo or Cloud, you will have different options available. For example, with Turbo and Cloud, you can simply press 'Enroll' and select one of your pre-built campaigns to enroll your list of targets into.
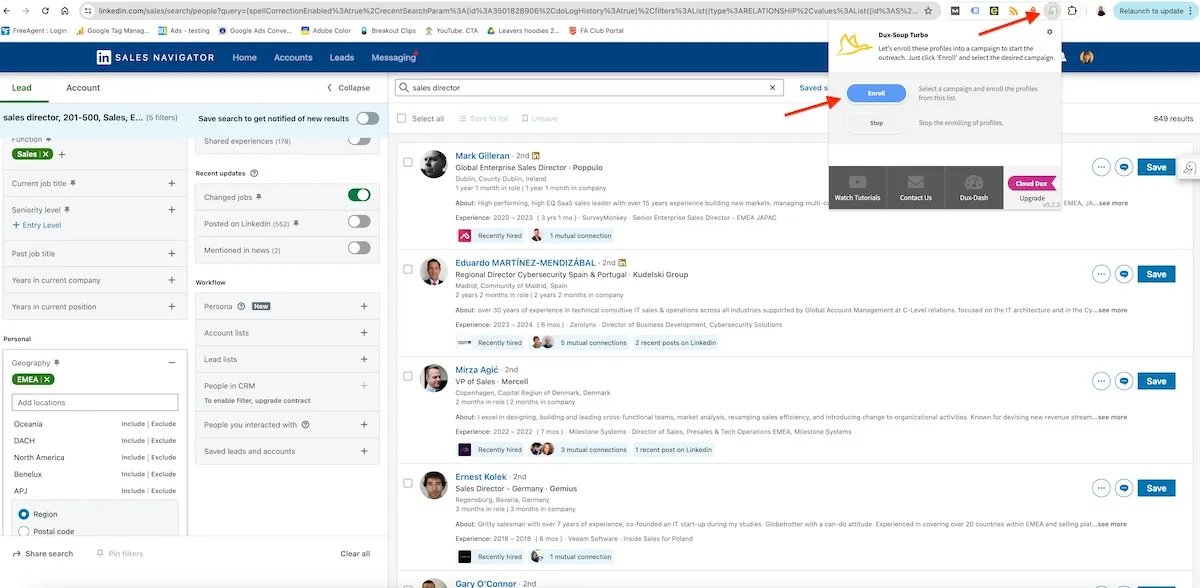
Once enrolled, you can move on to focus on other business and sales tasks (like scraping more data or directly messaging your 1st-degree connections) while Dux does the rest!
Tip: How to write LinkedIn connection messages that get results
Note: For the number of daily connection requests, we always advise sending connection requests to 3-5% of the total 1st-degree connections number no matter what type of LinkedIn account you have.
Sending InMails with Sales Navigator
InMails allow you to send direct messages to contacts that aren’t a 1st-degree connection, a feature that isn’t available with Regular LinkedIn. This allows you to contact people you couldn't otherwise reach.
With Sales Navigator you get 50 InMail credits each month, allowing you to reach out to your top prospects.
And, with Dux-Soup Pro, Turbo, and Cloud, you can automate personalized InMails, saving you lots of time over manually writing each one.
How to send InMails with Dux-Soup & Sales Navigator
a) Using Dux-Soup Cloud and Turbo
Sending an InMail is a feature that’s often needed if you’re on the hunt for leads. The free version of LinkedIn doesn’t allow users to send InMails. But with Sales Navigator, you can reach out and build relationships with leads outside your direct network.
The best way to send InMails if you have Cloud or Turbo is as a step in your Dux-Soup drip campaigns. You can get to your drip campaigns at https://app.dux-soup.com/web/drip-campaigns.
First, create a 'new campaign', then add an action to the campaign by clicking the '+' button at the bottom right corner of any action that's already there. Then, drag and drop your actions until you are happy with their order.
InMails should only be sent to people that aren't a first degree connection (you can send a direct message to your connections for free). So, a connection request action will always come after an InMail, never before. As we see below.

You can add other campaign actions following your InMail (or you can leave this as just an InMail if you like), totalling a maximum of 12 actions per campaign, personalizing messages with the placeholders shown, and adding custom time delays between actions. Once you are happy with your campaign actions, press 'save'.
Now, go back to the lead search result in Sales Navigator, click on the Dux-Soup icon and select “Enroll”. Select the campaign you wish to enroll them into and Dux-Soup will visit everyone on the list and send an InMail (followed by the other campaign actions) if you have enough InMail credits.

b) Using Dux-Soup Pro
If you have Pro, you can send InMails using the Dux-Soup ‘expert’ user interface.
First, ensure that you've activated the "expert" settings in the Options section found under the User tab.
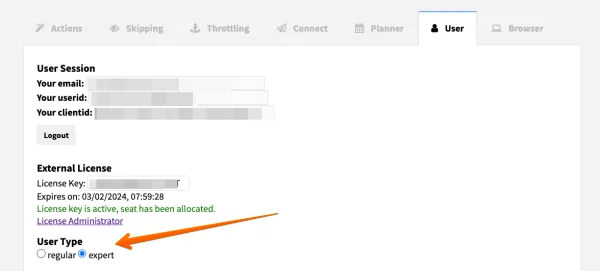
To create an InMail template, head to the Options, Actions tab:

Create your message using the personalization markers underneath for First Name etc.
When you're done, go back to the lead search result in Sales Navigator, click on the Dux-Soup icon and select “Visit”. Dux-Soup will visit the profiles and send each one an InMail providing you have enough credits.
How to send InMails without using up your InMail credits!
Although you'll get an InMail refunded every time someone responds to your InMail, purchasing extra InMail credits can be an expensive option. And if you run out of credits, Dux-Soup will stop sending InMails.
But here’s a good hack - sending an InMail to ‘OpenLink’ members doesn’t cost a credit!

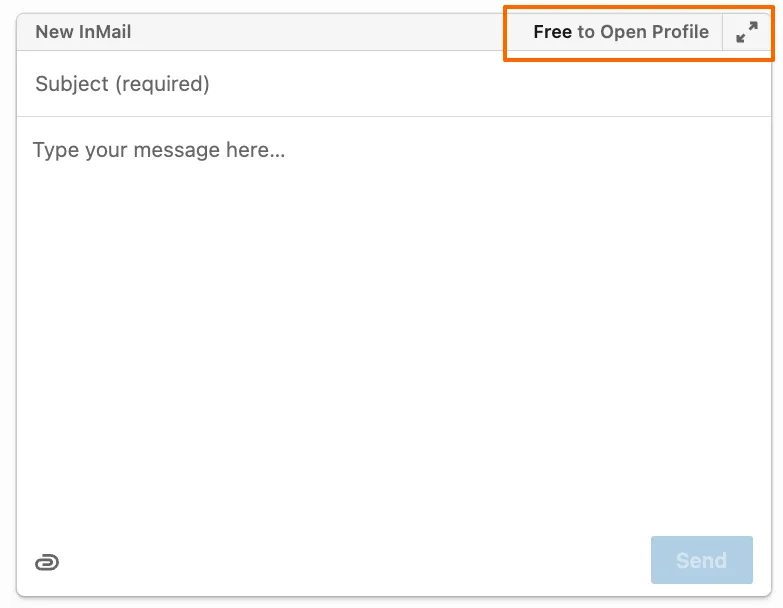
Dux-Soup can skip profiles who are not OpenLink members - how cool is that? The option to skip non-OpenLink members is located in the Skipping tab:

When turned on, Dux-Soup will automatically target just ‘OpenLink’ profiles, saving your InMail credits 💥
Tips on generating more leads with Dux-Soup and Sales Navigator
- By narrowing down your search results to target people that have posted on LinkedIn within the last 30 days, you'll get a better result as these people are more active on LinkedIn
- You can make your connection message really tailored by selecting users that have changed jobs within the last 90 days. Congratulating them on their new role and making your outreach relevant to this fact has delivered connection acceptance rates as high as 75%
LinkedIn will display Sales Navigator search results in order of SSI (social selling index),with those that have a high SSI at the top of the search results. So remember that the quality of prospect tends to reduce the further you get down the search, which may mean you want to start anew search once you get past page 8-10.
Save visited profiles as a lead in Sales Navigator
Another neat trick with Dux-Soup is the possibility to save visited profiles to a lead list in Sales Navigator. This option is located in Dux-Soup Options, Actions tab (so you'll need to be in expert mode):

Once you hit the “Visit Profiles” button, Dux-Soup opens a profile, clicks on the “Save” button and selects “My saved leads” option:
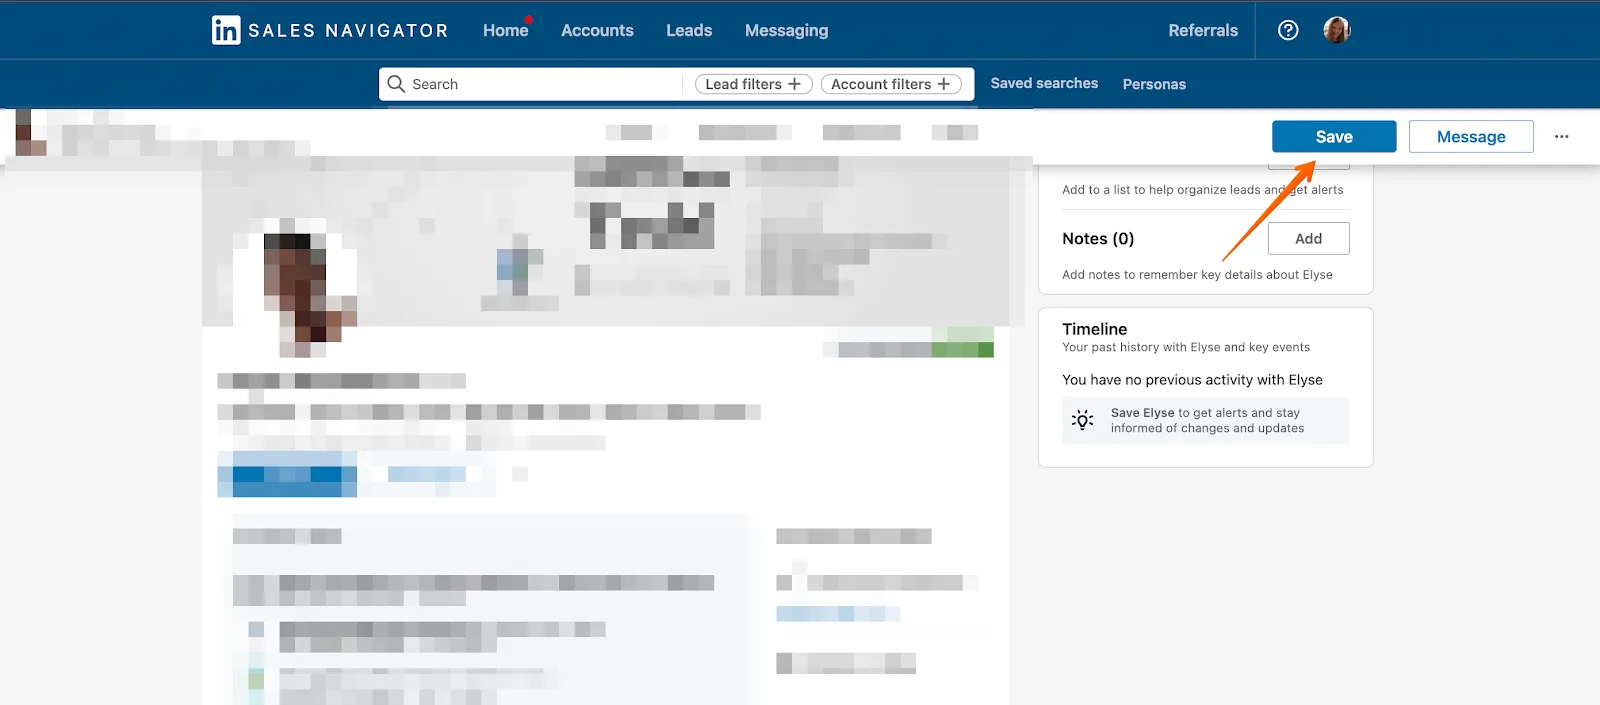
When you open the Lists page in LinkedIn Sales Navigator, your saved leads appear at the top-right corner:

Note that these leads weren’t added to the “Custom Lead List” yet. To do that, you can open “My saved leads” page and manually select the profiles you want to move the custom lead list or click on the “Select all” button and choose “Save to list”:

Tip: You can manually save your one page search result by simply clicking “Select All” and “Save to list” at the top of every page.
Data gathering
You can gather data from LinkedIn using Dux-Soup by scanning lists in Sales Navigator. Scanning profiles offers a significant time advantage compared to visiting them individually as Dux-Soup can quickly work through 100s of profiles in minutes.
First, you need to make sure you have the “Record profile data” option enabled in your Options>Browser tab:
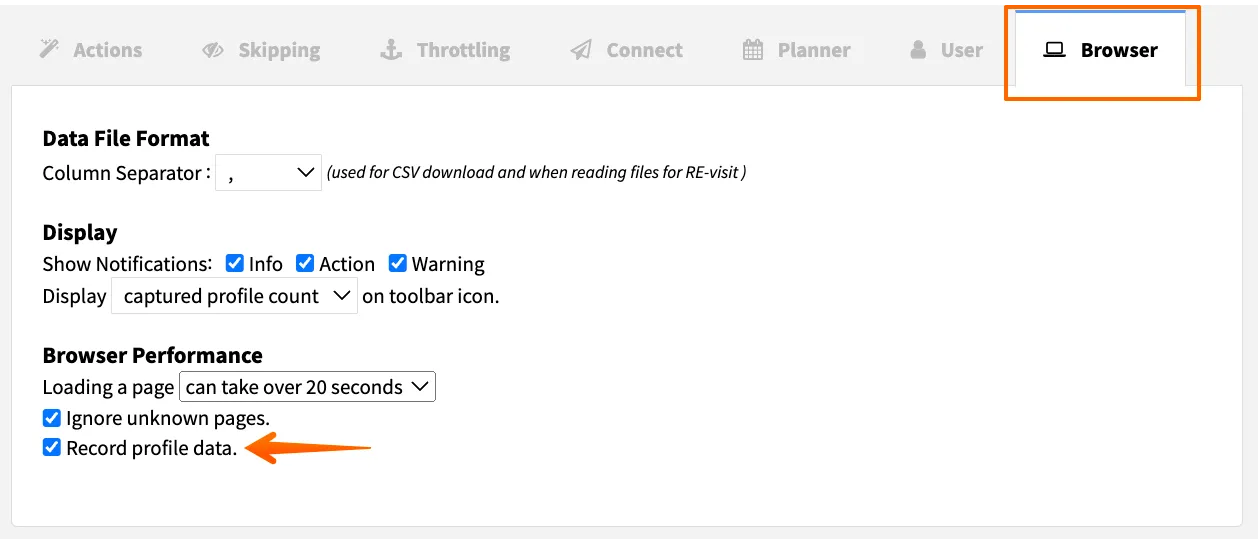
This will ensure that Dux-Soup records the data of profiles that you scan or visit using the tool. Once you have scanned a list of profiles, you can download the data to csv.
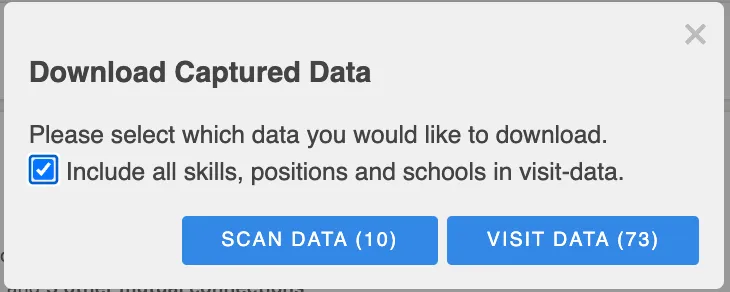
Note: There are two sets of data you can download once you click on the Download Data button:

You can download the data of the profiles you have visited in the past or the data you have scanned, the difference is visit data is extensive as Dux-Soup opens the profile and gets all the information available.
Extra Tip: You can scrape regular URLs in Sales Navigator using Dux-Soup
If you manually open a lead profile in Sales Navigator, you’ll notice that the URL has a different format compared to Standard LinkedIn. In the image below you’ll see we opened a profile from a search result in Sales Navigator, and the URL contains /sales/people in between:

If we open the same profile in Standard LinkedIn, the URL will look like this:

LinkedIn won’t let you open a Sales Navigator URL without a subscription - i.e. you’ll be asked to subscribe in order to view the profile. That’s not good news for many lead gen, marketing or digital agencies who used one Sales Navigator subscription to scrape leads and share lead lists among other team members - so they could then engage with the profiles from their Dux-Soup account.
But - Dux-Soup again comes to the rescue and can help you retrieve a regular URL in Sales Navigator if you use the “Scan Profiles” function. The regular URL is available in the CSV file among other scraped data.
Tagging profiles on Sales Navigator
As we have mentioned before, LinkedIn has recently removed its tagging feature. Don’t worry though - Dux-Soup has its own tagging system that works the same way that Standard LinkedIn and Sales Navigator used to. Here’s a quick tutorial showing you the Dux-Soup tagging system in action. You can also read more about tagging and untagging, on our support pages.
If you use an auto-tagging option (located in the Actions tab) or if you’re adding a tag manually, the tag is recorded in Dux-Soup Tricks, the CSV file and is also added to the Search by Tag tool at the same time.
It’s also worth mentioning that once Dux-Soup adds a tag in Sales Navigator, it actually records a profile with a particular tag using a standard URL. So, when you re-engage with profiles using the Search by Tag tool, the profiles scraped from Sales Navigator open up in Standard LinkedIn. This is great for those who don’t want to keep paying an expensive Sales Navigator subscription!
If you want to re-engage with profiles using Sales Navigator, you can use the Dux-Soup Revisit Data tool instead.
Summary
According to LinkedIn, an average user makes 250% more connections and has a 7% higher win rate using Sales Navigator. If you’re serious about lead gen we recommend using Sales Navigator to more effectively expand your network and enable the full potential of Dux-Soup.
Get more tips, and watch demos from our 'Generate more sales with Dux-Soup with Sales Navigator' webinar.
If you're not already a Dux-Soup user, don't forget to click on the button below!
If you have any feedback, questions, or comments - we’d love to hear them. Leave your comment here or feel free to contact us at info@dux-soup.com and we’ll be sure to get back to you!
Further reading:
How to use LinkedIn for recruitment
How to use LinkedIn automation effectively


