Sometimes lead tracking tends to be overwhelming and that is why building a simple tracking dashboard might be the right solution for you!
A simple dashboard can help you focus on turning LinkedIn leads into a won deal by recording what activity has been applied to each profile and what response has been received.
Using Zapier + Google Sheets will help you automate the process by putting all the activity you have done with Dux-Soup into one place.
Another important benefit of using Google Sheets is the ability to access and monitor your leads from any device!
If that sounds like a good idea - continue to read, because in this blog you can learn how to:
- use different Dux-Soup events to catch webhooks;
- build a simple lead tracking dashboard in Google Sheets;
- trigger 5 webhooks with Zapier to track what activity has been applied to the LinkedIn prospects and what response has been received.
Note: you need Dux-Soup Turbo for this to work.
Dux-Soup activity scenario: Visit the prospects and connect with them using the connection message and 1 follow-up message.
Zapier activity scenario: Make 5 zaps using different Dux-Soup events and connect them to Google Sheets.
Using Different Dux-Soup Events to catch a Webhook
Just before we start, it is important to distinguish what sort of events we will send to Google Sheets. With Dux-Soup Webhook feature, you can trigger the following events: visit, scan, action, message, remote control. You can access the API documentation here.
In our scenario, we want to track what activity has been applied to the LinkedIn prospects, and what response has been received. That means we will use these events:
- Visit - to record the prospect in Google Sheets;
- Action - to update the prospect in Google Sheets once we send one connection message;
- 3 Message events - to update the prospect once the prospect accepts the connection request and once we send or receive a message.
Building a Simple Lead Tracking Dashboard in Google Sheets
In our previous blog, we discussed how to customize Google Sheets and connect it with Zapier. Therefore, we jump straight away on how to customize this particular scenario:
Once you have made a new Google Spreadsheet, name the columns in the first row:

Suggested names (columns A-L):

Note:
A-F columns will be customized and updated with the 1st Zap;
G - with the 2nd Zap;
H - with the 3rd Zap;
I and J - with the 4th Zap;
K and L - with the 5th Zap.
Triggering 5 webhooks with Zapier
We have previously discussed what is the webhook and how to “catch” one using Zapier. If you have missed this - here is the previous blog.
Once our Spreadsheet is ready, we need to make 5 Zaps. Find the detailed steps below.
1st Zap - connecting Dux-Soup visit event to Google Sheets via Zapier

9. Select an Action App → Google Sheets and select an Action Event → Find or Create Row in the Spreadsheet
10. Choose your account and customize the Spreadsheet row:
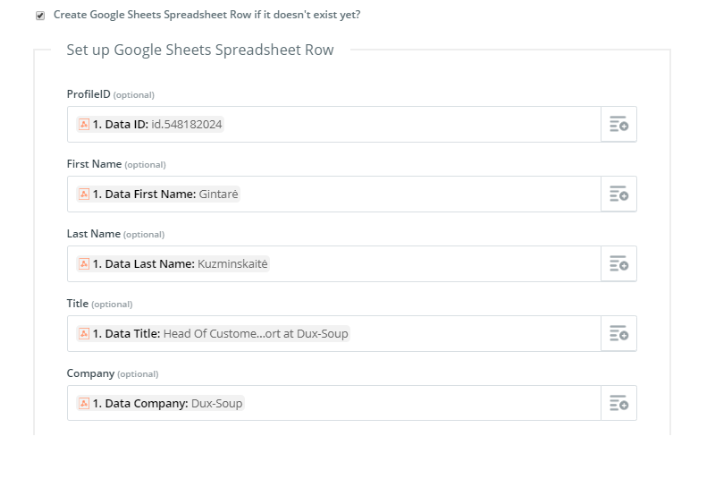
11. Tick “Create Google Sheets Spreadsheet Row if it doesn’t exist yet?” and customize the columns A-F:
12. Send the test data to your Spreadsheet and add another Zapier Action App → Google Sheets and select an Action Event → Update Spreadsheet Row :

13. Send the test data to Google Sheets and turn on your 1st Zap. Your Zap should look like this:

2nd Zap - sending Dux-Soup connection request event to Google Sheets via Zapier
1. Go to Zapier and make a new Zap;
2. Select the Trigger app → Webhooks by Zapier and the Trigger event → Catch Hook;
3. Retrieve the webhook URL and copy it to Dux-Soup Options, Connect tab;
4. Make sure that you have ticked only the action event:

5. Go to your LinkedIn page and send an automated connection request to the profile with Dux-Soup;
6. Test this event in the following step in Zapier;
7. Select the event Filter:

8. Select an Action App → Google Sheets and select an Action Event → Lookup Spreadsheet Row;
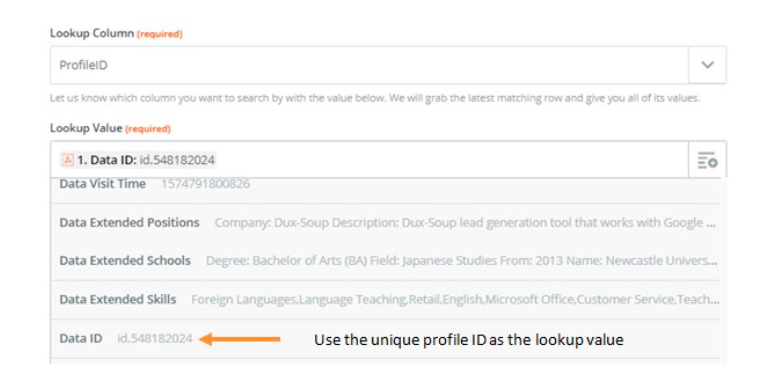
9. Choose your account and set Lookup Column to ProfileID add the Lookup Value:

10. Send the test data to your Spreadsheet and add another Zapier Action App → Google Sheets and select an Action Event → Update Spreadsheet Row;
11. Customize the Spreadsheet column (G):

12. Send the test data to Google Sheets and turn on your 2nd Zap.
3rd Zap - sending accepted connection event to Google Sheets via Zapier
1. Go to Zapier and make a new Zap;
2. Select the Trigger app → Webhooks by Zapier and the Trigger event → Catch Hook;
3. Retrieve the webhook URL and copy it to Dux-Soup Options, Connect tab;
4. Make sure that you have ticked only the message event:

5. Wait until the prospect accepts the connection request (make sure that Message Bridge is enabled and Dux-Soup runs a check for the new connections):

6. Test this event in the following step in Zapier;
7. Select the event Filter:

8. Select an Action App → Google Sheets and select an Action Event → Lookup Spreadsheet Row;
9. Choose your account and set Lookup Column to ProfileID add the Lookup Value;
10. Send test data to your Spreadsheet and add another Zapier Action App → Google Sheets and select an Action Event → Update Spreadsheet Row;
11. Customize the Spreadsheet column (H):

12. Send the test data to Google Sheets and turn on your 3rd Zap.
4th Zap - connecting sent message event to Google Sheets via Zapier
1. Go to Zapier and make a new Zap;
2. Select the Trigger app → Webhooks by Zapier and the Trigger event → Catch Hook;
3. Retrieve the webhook URL and copy it to Dux-Soup Options, Connect tab;
4. Make sure that you have ticked only the message event:

5. Create a message event with Dux-Soup;
6. Test this event in the following step in Zapier;
7. Select an Action App → Google Sheets and select an Action Event → Lookup Spreadsheet Row;
8. Choose your account and set Lookup Column to ProfileID;
9. Select the event Filter:
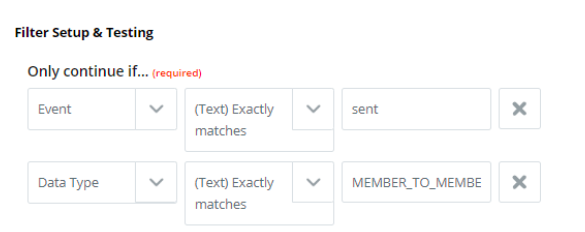
10. Send the test data to your Spreadsheet and add another Zapier Action App → Google Sheets and select an Action Event → Update Spreadsheet Row;
11. Customize the Spreadsheet columns (I-J):

12. Send the test data to Google Sheets and turn on your 4th Zap.
5th Zap - connecting responded message event to Google Sheets via Zapier
1. Go to Zapier and make a new Zap;
2. Select the Trigger app → Webhooks by Zapier and the Trigger event → Catch Hook;
3. Retrieve the webhook URL and copy it to Dux-Soup Options, Connect tab;
4. Make sure that you have ticked only the message event:

5. Wait until you receive a message;
6. Test this event in the following step in Zapier;
7. Select the event Filters:
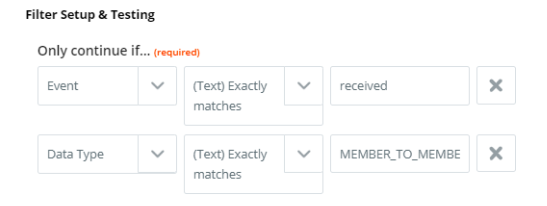
8. Select an Action App → Google Sheets and select an Action Event → Lookup Spreadsheet Row;
9. Choose your account and set Lookup Column to ProfileID;
10. Send test data to your Spreadsheet and add another Zapier Action App → Google Sheets and select an Action Event → Update Spreadsheet Row;
11. Customize the Spreadsheet columns (K-L):

12. Send the test data to Google Sheets and turn on your 5th Zap.
If you have successfully completed all the steps, the Connect tab (Dux-Soup Options) should look like this:
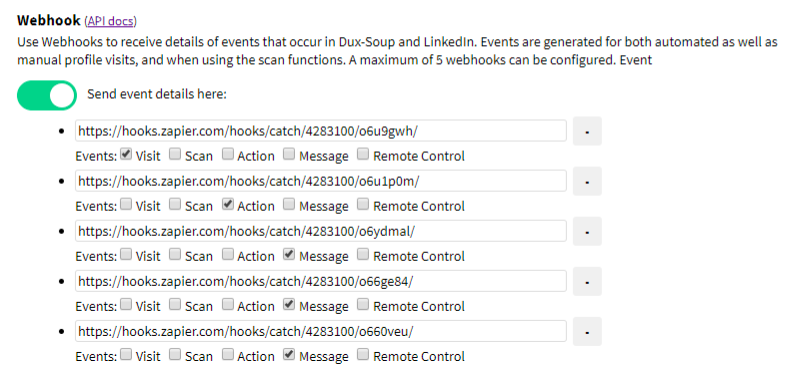
Here you are - it’s all set up and ready to record your Dux-Soup activity in Google Sheets!

Join our webinar to learn more
See a lead tracking dashboard set up up in real-time by registering for our free webinar here. You will also get more practical help from Dux-Soup Founder, Will van der Sanden. Plus loads of opportunity for Q&A!
Just so you know, if you are unable to participate - you can watch all previous webinar recordings here.
Should you have any further questions, feel free to contact Dux-Soup support at info@dux-soup.com and send us your comments, suggestions or feedback.


