LinkedIn is a much-loved tool for recruiters. The global B2B social networking site offers recruiters a searchable database of candidates from which to find the next perfect employee for clients. Its global reach and free entry point mean it has grown to over 930 million members.
These stats demonstrate its power for connecting recruiters with the perfect candidates:
- 87% of recruiters use LinkedIn to find candidates
- Over 15 million jobs are currently advertised on LinkedIn (May 2023)
- 6 people are recruited every minute on LinkedIn
- Over 49 million people search for jobs on LinkedIn every week
- Over 12 million LinkedIn profiles are ‘Open to Work’
As useful a resource as it is though, most recruiters can use LinkedIn much more efficiently. Work cleverly, and you can save as much as 75% of your time spent on LinkedIn, whilst achieving the same results.
Want to know how? Then read on as we cover the tools and techniques to achieve this when using LinkedIn for recruitment.
Step 1: Which LinkedIn plan?
To start with, let’s address whether a free plan or premium (Paid) LinkedIn plan is right for you. With Regular, Sales Navigator and Recruiter plans, just getting off the blocks with LinkedIn can be confusing.
LinkedIn Recruiter Plans
LinkedIn makes it difficult to compare their Recruiter plans and see how much they cost, so here the legwork is done for you to compare the costs and see the key features available.
To see LinkedIn’s full version, go to the LinkedIn recruiter plans comparison table
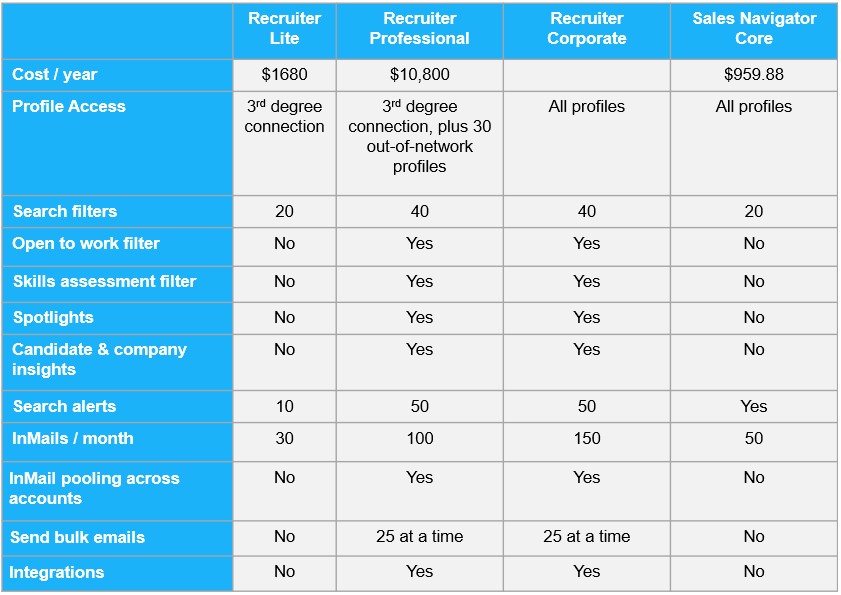
In a nutshell, the main differences between the 3 LinkedIn Recruiter plans are the number of search filters, the volume of InMails you can send, and the ability to share activity across your team members. Corporate pricing depends on how many licenses you want and your location.
LinkedIn Recruiter vs Sales Navigator
If you’re an individual recruiter, then the Professional version is a big step up in price for the extra actions you can perform, and you could consider a Sales Navigator account instead.
Having said that, one of the biggest advantages of Recruiter Professional is the ‘Open to work’ filter which can help you to get in front of people actively looking for their next job opportunity. These profiles can only be searched for with a LinkedIn Recruiter Professional/Corporate license.
Some recruiters however prefer to steer clear of the ‘Open to work’ market, as they seek to instead headhunt candidates that are excelling in a current role. In this case, accessing unlimited profiles with Sales Navigator can be an attractive option.
Why we don’t recommend Regular LinkedIn
It can be an option to stick with a regular (free) LinkedIn account. However, if you want to take advantage of the techniques we recommend here, then we strongly advise that you opt for a paid plan.
This is because a regular LinkedIn account restricts activity. You won’t be able to send as many connection requests or direct messages, or search for, or view as many profiles.
With a Regular LinkedIn account you really won’t get the benefits of the automation tools and techniques covered. So, if you want to save 75% of your time, then you’re going to need a Recruiter or Sales Navigator plan.
Step 2: Automation tools
So you‘ve decided on your LinkedIn plan, and for this blog, we’ll assume it’s Recruiter. If you opt for Sales Navigator you can still automate your outreach.
Automating outreach with Dux-Soup and Sales Navigator.
Now, back to Recruiter and how to save that magical 75% of your time. A lot of this is done by using automation.
Dux-Soup is a tool that allows you to automate your candidate outreach activity, so once you’ve got a LinkedIn approach that works, you can automate repetitive tasks including:
- Scanning Profiles and gathering LinkedIn URLs and data for download
- Visiting profiles
- Sending direct messages or InMails
- Running multi-touch drip campaigns
- Sending leads to your CRM system
We’re going to work here with Dux-Soup Turbo which gives you access to all of these features.
Free Dux-Soup Trial
The good news is you can get a free 2-week trial of Dux-Soup to test this out and decide whether it’s right for you (if you go straight to buy Dux-Soup then you’ll automatically get 2 weeks for free if it’s your first time installing it.)
So go ahead and install Dux-Soup and we can get started.
Step 3: Finding your candidates on Recruiter
Head into Recruiter to find your talent pool of candidates.

From here you can create new talent searches or access existing searches.
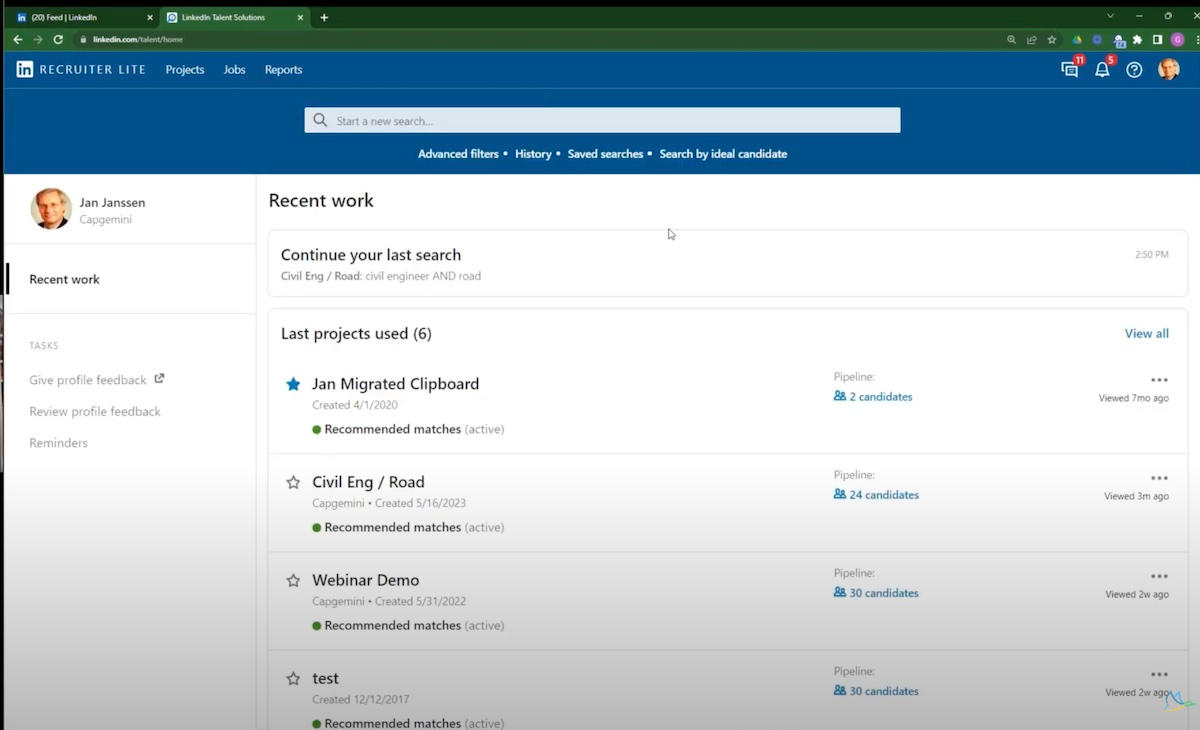
By clicking into a search, you’ll get your talent pool list. Here we’ve chosen engineers.
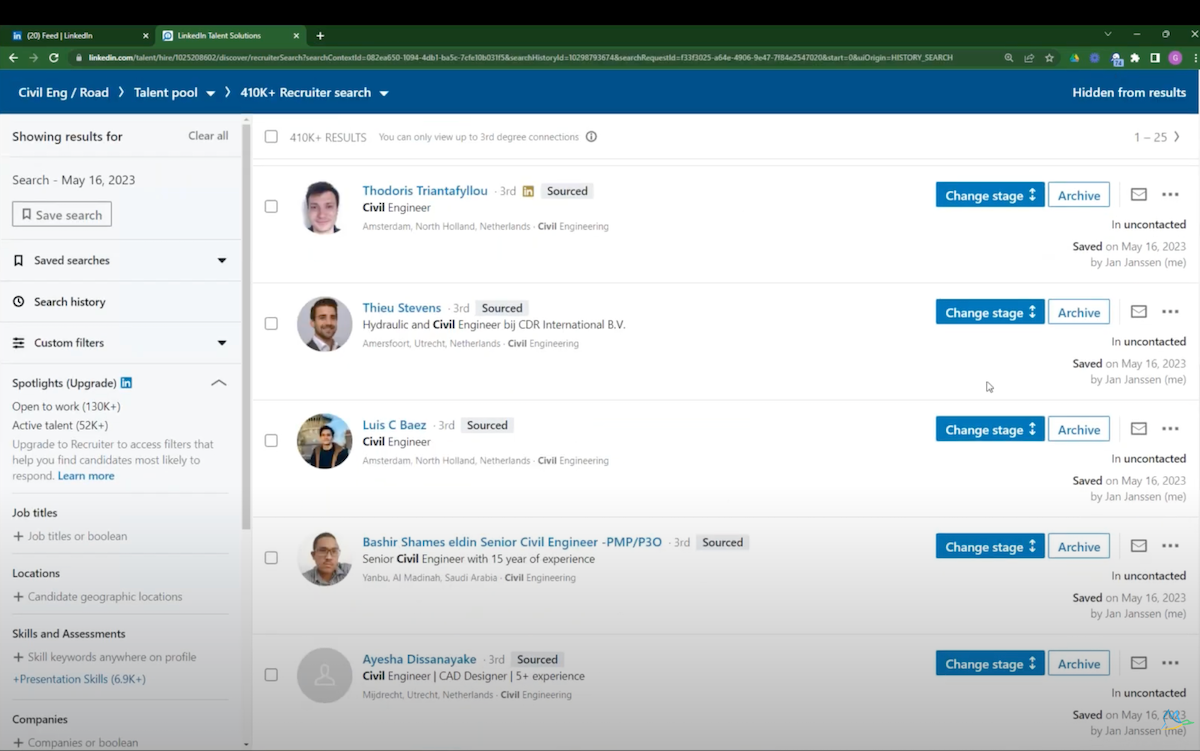
Use as many filters as you like when searching for talent. By making your search more specific, you can improve relevance. Some tips here are to look for profiles Open to Work, select by skills, and even candidates working for competitor companies.
You can then either choose to automate your LinkedIn activity straight from your talent pool or save selected profiles to your pipeline to narrow down your selection even further.
Step 4: Automating your candidate outreach
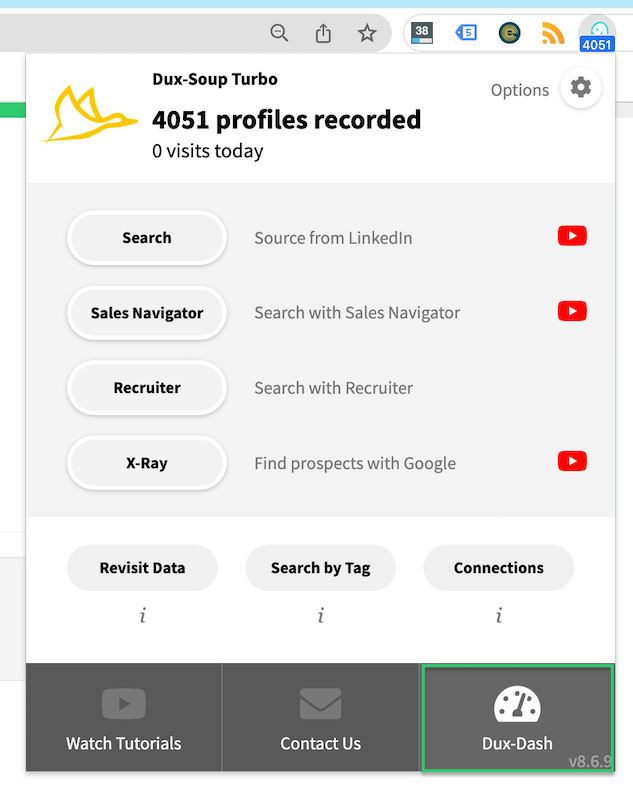
It’s really simple to run automated actions to your talent pool. When you’re in your Talent pool or your Pipeline list, just click on your Dux-Soup extension and select the action you’d like to take.
We recommend that you enroll candidates into a campaign by clicking ‘Enroll Profiles’ on the extension.
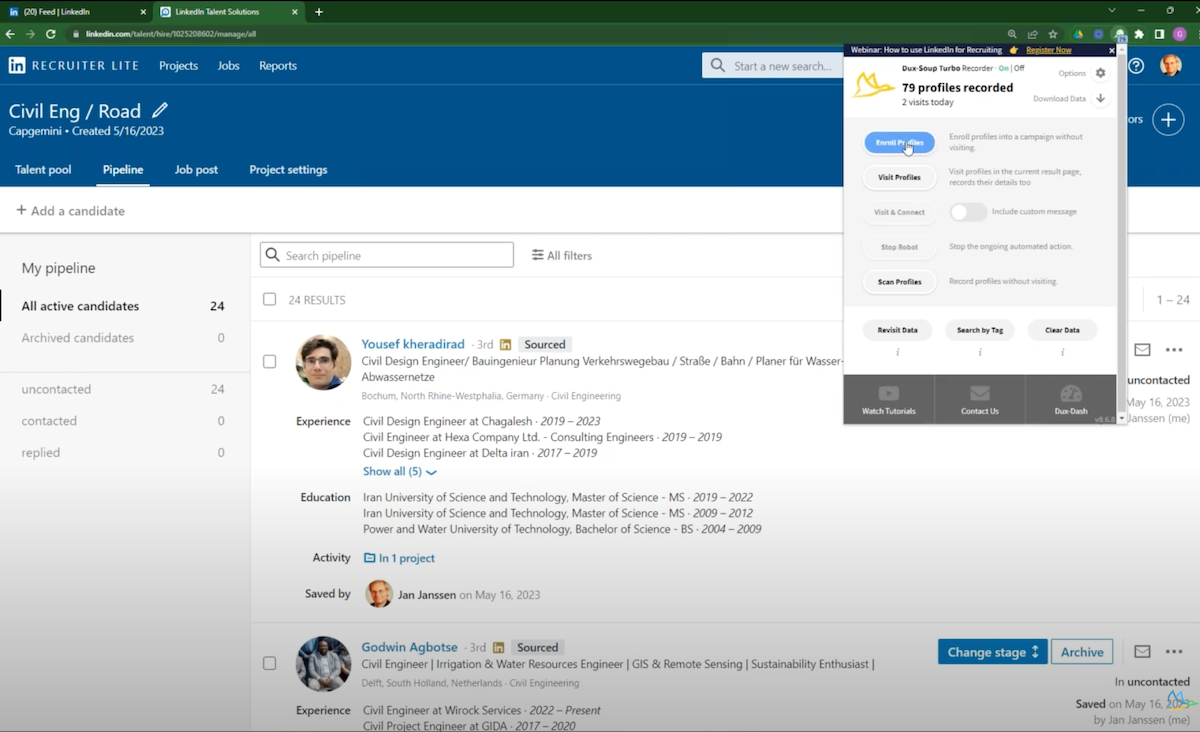
Dux-Soup will then take over the work of running the actions on your behalf. But first, you’ll need to set up those actions by creating your campaign.
Step 5: Create your campaign in Dux-Soup
Head to the Dux-Dash from the bottom right of your Dux-Soup extension, or by visiting https://app.dux-soup.com/
And then go to your drip campaigns section (this is the 2nd option on the left).

Click on ‘new campaign’ to create a fresh campaign (or clone an existing one).
- Give your campaigns a name. This will automatically become the campaign ID.
- Select ‘Tag profiles with ID when enrolling’ so you can easily find them again for future targeting.
- Choose whether to run your campaign in Regular LinkedIn or Recruiter. If you select Recruiter as your target then any InMail responses will be diverted to your Recruiter Inbox, stopping any further campaign activity so you can follow up your leads manually.
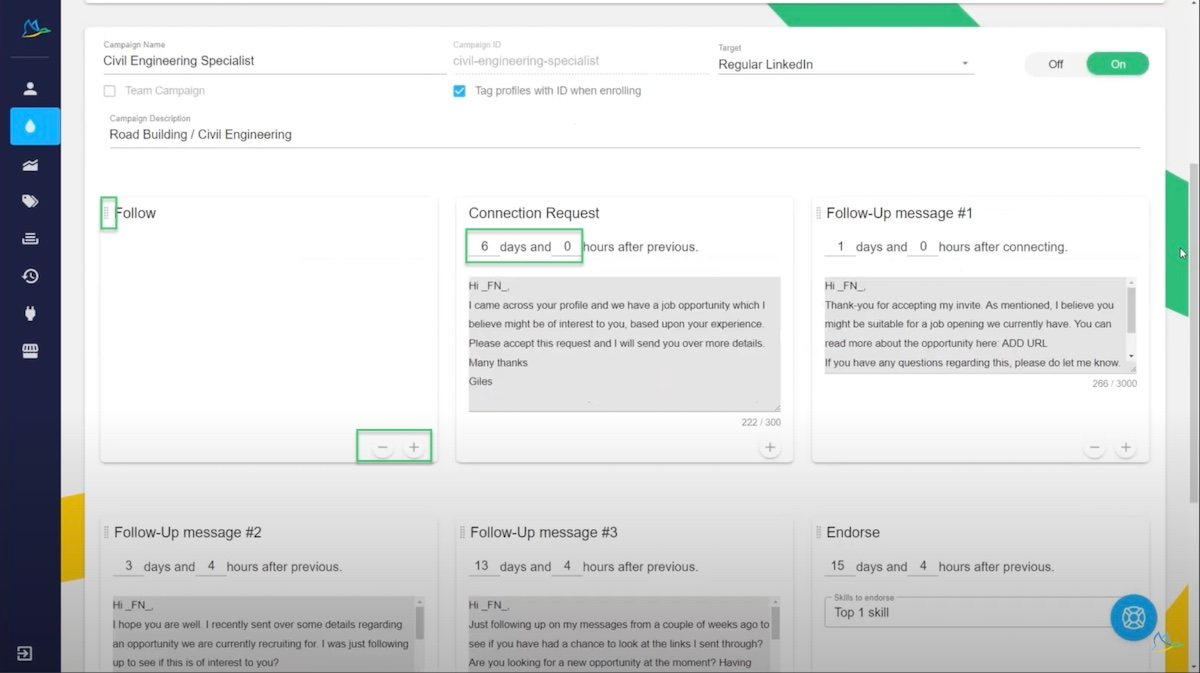
- Add ‘follow’ as the first action. This will alert candidates that you have followed them so they gain instant awareness of your brand. Add this step by clicking on the +icon, selecting ‘follow’, and then dragging this action to the front with the handle on the top left corner of the action.
- Add your connection message. We’ve included an example here. Make sure you personalize it using the Dux-Soup personalization tags under the campaign details.
- Add a single, or series of follow-up messages and InMails. You can set delays from the previous action so that these look natural, and at timescales that work to your role deadline.
- Endorse your candidate for their top skill/s to make you stand out as a recruiter and give them some kudos - all creating a positive feeling about engaging with you.
You can see this campaign example created below. You have a maximum of 12 actions within your campaign - including Follow, Visit, Message (this will only work with 1st degree connections), InMail, and Endorse.
Use the actions as you see fit and test out alternative campaign strategies to understand which one is the most successful for you.
Step 6: Enroll your profiles into campaigns
As mentioned in step 4, you can enroll profiles very quickly by clicking ‘Enroll Profiles’ from your Dux-Soup extension when you have your list of candidates in Recruiter.
Once you’ve clicked ‘Enroll Profiles’ you’ll see the Dux-Soup actions running on your screen in green to confirm that your list is being enrolled.

Step 7: Watch the magic happen and enjoy saving 75% of your time
This is where you can give yourself a pat on the back for having just saved yourself time manually carrying out all those actions. All you need to do is enroll more profiles into your campaign to generate more results.
But there’s still more that we can do to optimize your results.
Step 8: Analyze your results
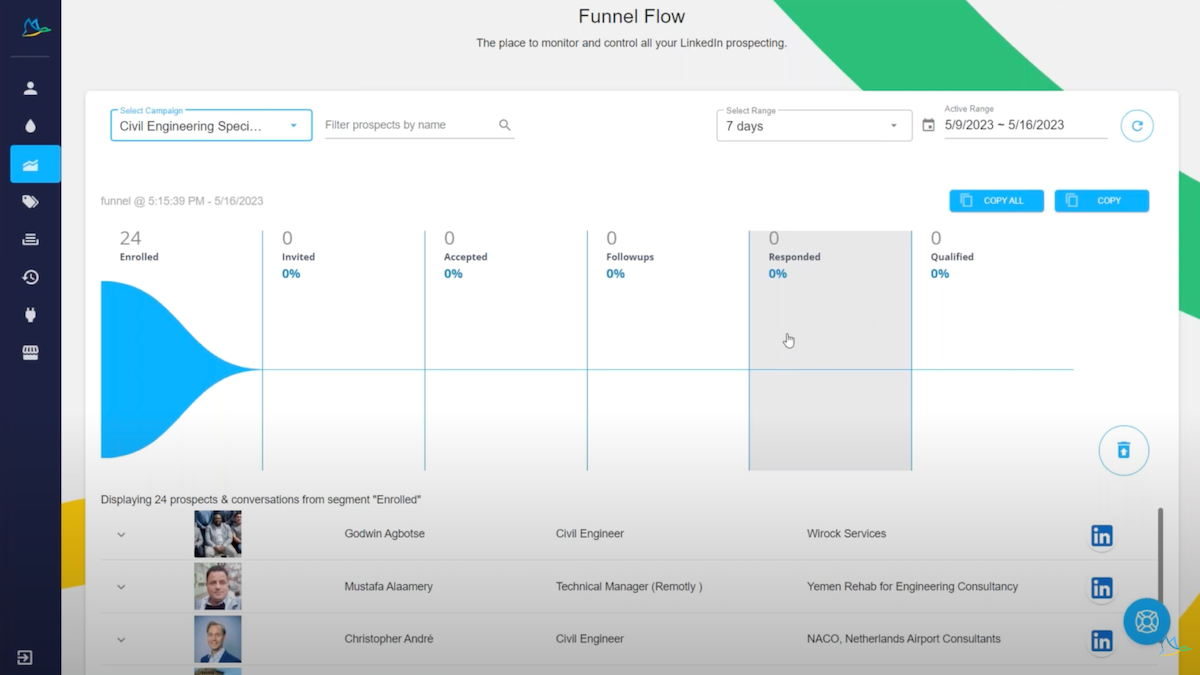
In the Dux-Dash, head to the ‘Funnel Flow’ (3rd option on the left) to see the results of your campaigns.
By setting up different campaigns you can see how this affects your connection acceptance rates and responses, allowing you to optimize your messaging and action sequences to get more conversions.
And there you have it. An easy-to-follow method for recruiting with LinkedIn, which uses automation to save 75% of your time.
Additional Resources:
Video: How to use LinkedIn for recruiting
Blog: Top Tools Used by Recruiters to scale business growth
Video: How to get started with Dux-Soup in 5 simple steps
Blog: How to Create Dux-Soup Campaigns
Blog: How to Enroll Prospects into Campaigns
Blog: How to scale your recruitment business with automation
Blog: Xing vs LinkedIn: a comparison guide for recruiters
Afterthought
As an afterthought, Recruiters have been known to get bad press from not following up with candidates to the 9th degree on LinkedIn. Understandably, it’s a difficult challenge to manage time effectively. The task of finding candidates, engaging with them, and then following each one up individually is time-consuming.
And that’s where automating processes such as these can free up your time. Whether you spend your newfound free time on closing placements, finding new clients, or responding to every candidate with feedback is up to you.
If you need any help with Dux-Soup then feel free to contact our friendly support team on info@dux-soup.com


