How to keep track of all your LinkedIn conversations with Dux-Soup Turbo
We are constantly asked by our users for a way to keep track of and manage LinkedIn conversations. LinkedIn doesn’t make this particularly easy so here are some detailed steps on how to achieve this with Dux-Soup Turbo!
Tracking these conversations through to conversion is crucial to successful lead generation - as it allows you to focus on your hottest prospects and get a great ‘birds eye’ view of how your LinkedIn outreach and lead generation is going.
Dux-Soup Turbo provides you with the ability to track conversations in LinkedIn using the Webhook feature.
Below is an easy step-by-step guide to connect LinkedIn conversations to Google Sheets using the Webhook feature and Zapier - and start tracking them!
Setting up Google Sheets
In this scenario, we want to track what messages have been sent to LinkedIn prospects, and what response has been received. That means we will use these events and create 3 Zaps:
- Visit - to record the prospect in Google Sheets;
- Action - to update the prospect in Google Sheets once we send a message;
- Message - to update the prospect once the prospect responds.
To do that, we first need to create a new Google Spreadsheet. Once you have done this, name the columns in the first row:

Note:
A-E columns will be customized and updated with the 1st Zap;
F and G with the 2nd Zap;
H and I with the 3rd Zap.
After you have set your Google Sheets, here are the steps to take next!
1st Zap - connecting Dux-Soup visit event to Google Sheets via Zapier
1. Go to Zapier and make a new Zap
2. Select the Trigger app → Webhooks by Zapier and the Trigger event → Catch Hook
3. Retrieve the webhook URL and copy it to Dux-Soup Options, Connect tab and make sure that you have ticked only the visit event.
4. Click on Send Sample button:

5. You will receive two webhooks in Zapier. If you wish to record an email, please make sure that you have selected update visit event (learn about the visit event differences here):

6. Add Filter by Zapier:

7. Select an Action App → Google Sheets and select an Action Event → Lookup Spreadsheet Row:

8. Choose your account and customize the Lookup column and value :
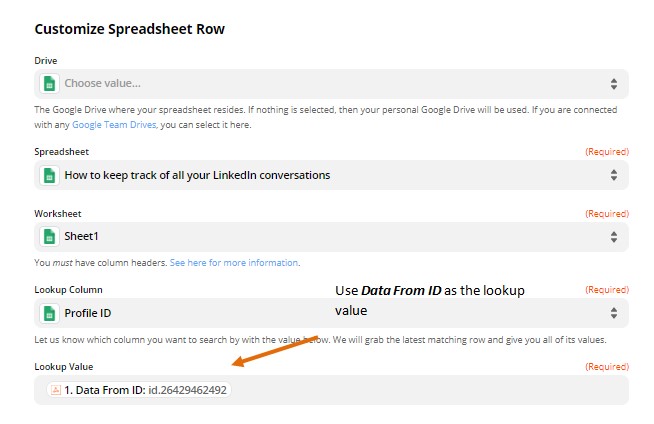
9. Tick “Create Google Sheets Spreadsheet Row if it doesn’t exist yet?” and customize the columns A-E:
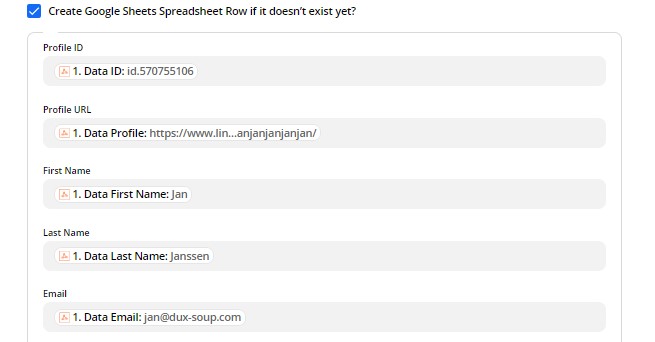
10. Send the test data to your Spreadsheet and add another Zapier Action App → Google Sheets and select an Action Event → Update Spreadsheet Row :

11. Use a Custom Value for Row ID which is the result of a row-search based on the Profile ID:
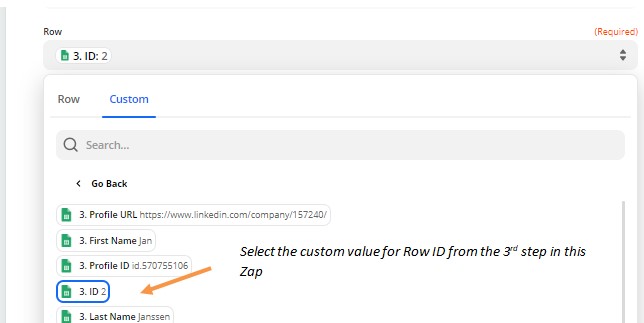
12. Customize Google Spreadsheet columns A-E:
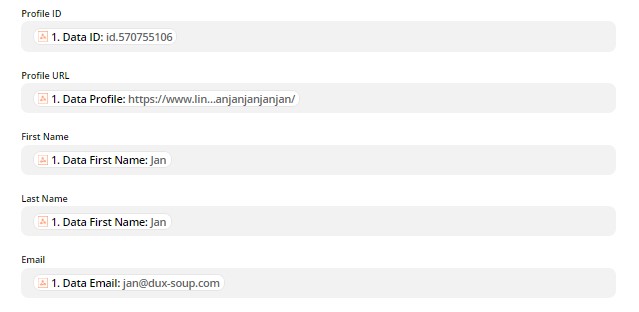
13. Send the test data to Google Sheets and turn on your 1st Zap. Your Zap should look like this:

2nd Zap - connecting Dux-Soup action event to Google Sheets via Zapier
1. Go to Zapier and make a new Zap;
2. Select the Trigger app → Webhooks by Zapier and the Trigger event → Catch Hook;
3. Retrieve the webhook URL and copy it to Dux-Soup Options, Connect tab and make sure that you have ticked only the Action event.
4. Click on Send Sample button:

5. Go back to Zapier and select Continue.
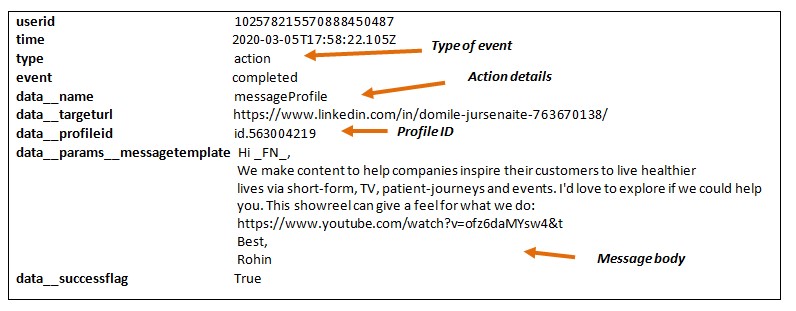
6. You will receive 3 Hooks in Zapier:

Note: Make sure that you have selected update messageProfile event hook that contains the following information:
7. Add Filter by Zapier:

8. Select an Action App → Google Sheets and select an Action Event → Lookup Spreadsheet Row
9. Choose your account and set the Lookup value to ProfileID (step No 8 from the 1st Zap)
Note: don’t click on “Create Google Sheets Spreadsheet Row if it doesn’t exist yet?” as this option should be enabled only for your 1st Zap.
10. Send the test data to your Spreadsheet and add another Zapier Action App → Google Sheets and select an Action Event → Update Spreadsheet Row
11. Set custom value for Row ID (step No 11 from the 1st Zap);
12. Customize the Spreadsheet columns (F-G):
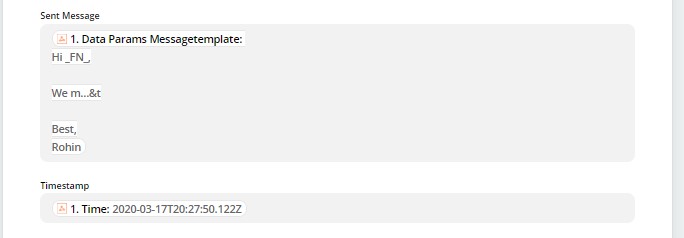
13. Send the test data to Google Sheets and turn on your 2nd Zap.
3rd Zap - connecting Dux-Soup responded message event to Google Sheets via Zapier
1. Go to Zapier and make a new Zap;
2. Select the Trigger app → Webhooks by Zapier and the Trigger event → Catch Hook;
3. Retrieve the webhook URL and copy it to Dux-Soup Options, Connect tab and make sure that you have ticked only the Message event.
4. Click on Send Sample button:
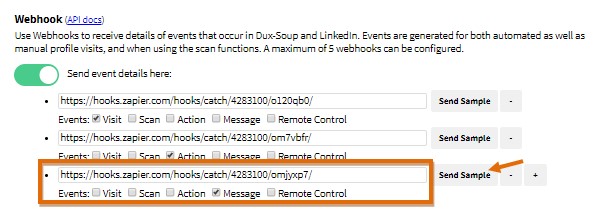
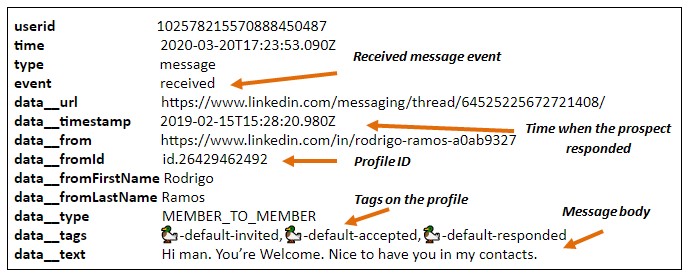
5. Go back to Zapier and select Continue. You will receive 3 webhooks:

Note: Make sure that you have selected a received message hook:
6. Add Filter by Zapier:
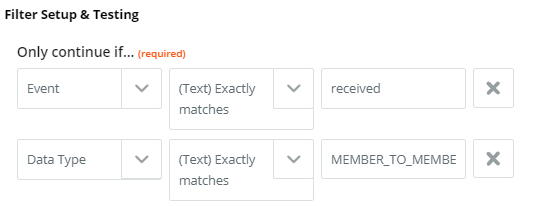
7. Select an Action App → Google Sheets and select an Action Event → Lookup Spreadsheet Row;
8. Choose your account and set the Lookup value to ProfileID (step No 8 from the 1st Zap)
Note: don’t click on “Create Google Sheets Spreadsheet Row if it doesn’t exist yet?” as this option should be enabled only for your 1st Zap
9. Send test data to your Spreadsheet and add another Zapier Action App → Google Sheets and select an Action Event → Update Spreadsheet Row;
10. Set custom value for Row ID (step No 11 from the 1st Zap);
11.Customize the Spreadsheet columns (H-I):

12. Send the test data to Google Sheets and turn on your 3rd Zap.
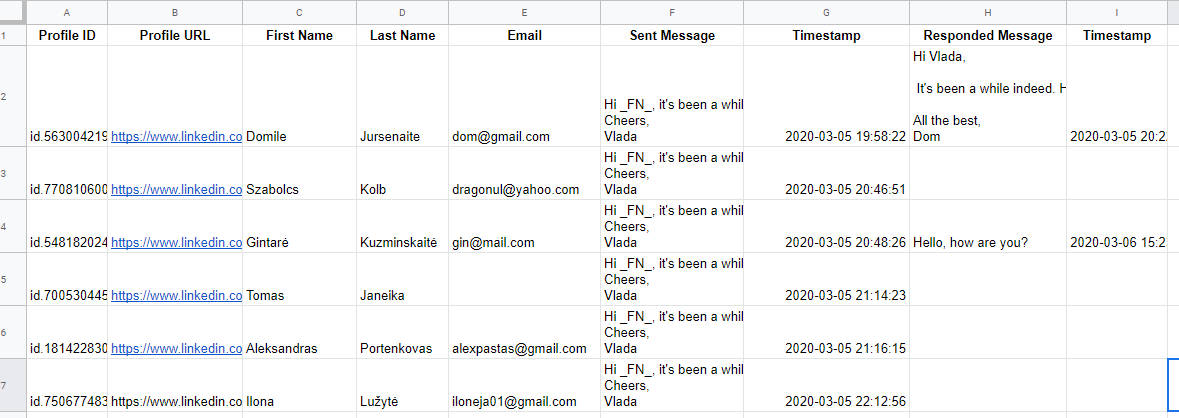
Here is the final result of LinkedIn conversations in Google Sheets:
Join our webinar to learn more
Join this practical webinar where we'll show you how to use Dux-Soup and Google Sheets to bring all your conversations into one place - so they can be easily managed and tracked.
If you’re reading this after the 17th of March then watch the recording here.
Should you have any further questions, feel free to contact Dux-Soup support at info@dux-soup.com and send us your comments, suggestions or feedback.


