Updated June 2023
Running LinkedIn Campaigns with Dux-Soup
There’s no doubt that personalization is a hot topic when it comes to the sales outreach landscape. But can you still achieve high levels of personalization whilst scaling up your outreach activity to generate more leads from LinkedIn?
You can with Dux-Soup! It allows you to send multiple, concurrent drip campaigns to targeted LinkedIn prospects whilst personalizing each individual message for improved conversion rates.
Quality and quantity – now that’s music to our ears!
Our automated campaigns take LinkedIn lead generation to the next level, raising the bar in terms of scale and targeting - allowing you to reach more of your prospects, faster.
Campaigns are available with our Turbo plan, so if you like what you see, you can buy Dux-Soup Turbo.
User-driven development
Dux-Soup’s user base is instrumental to our product development schedule, and every Dux-Soup user can propose and nominate new features they would like to see within the product – it’s something we actively encourage.
The ability to run multiple drip campaigns at the same time carried the highest demand from our user base and so we made it happen – because customers always come first, right?
How does the ability to run simultaneous drip campaigns help with lead gen?
Multiple drip campaigns allow you to run different personalized message sequences to different prospect lists in LinkedIn. No ‘one size fits all’ approach here.
Create up to 12 automated actions per drip campaign – choosing from Follow, Endorse, Connect, Message and InMail. Set the delay between actions to as long as you like, allowing you to craft out the right outreach strategy for your business.
All of this means that you can target more of your prospects (in a personalized manner) simultaneously, generating a larger volume of leads, faster. In true growth hacking style, you can accelerate your lead generation significantly.
Note: Dux-Soup is designed to alternate between multiple campaigns while maintaining the daily limits you set. It ensures that you won't exceed the maximum number of connection requests for all campaigns combined. You don’t want to overdo your connection invitations and we encourage you to stay within LinkedIn’s safety limits to keep your account in good stead.
Once you have enrolled contacts in a campaign and a prospect has accepted your connection request, that campaign will flow even after you have moved on to your next enrolment campaign.
Managing your drip campaigns
Drip campaigns are configured and managed within the Dux Dash - this is the lead management dashboard where you will manage, edit and analyze your LinkedIn automation pathways.
There are 3 key steps to drip campaigns:
1. Create the drip campaign workflow
2. ‘Apply’ the campaign to your target audience to enable it to run
3. Monitor your campaign ‘per activity’
1. Creating drip campaigns
Watch our Drip Campaign Tutorial
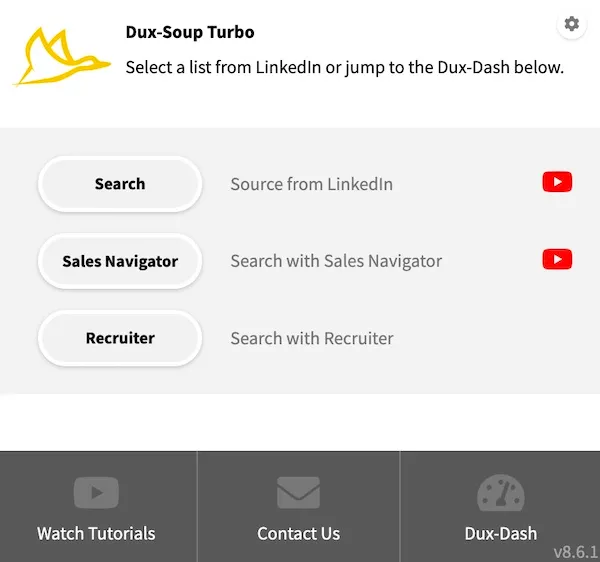
Start by clicking on the Dux-Soup icon (of your Chrome browser extension). Then, in the menu, click on click on"Dux-Dash" in the bottom right corner to open the Dux-Dash.
You’ll notice the option in the left-hand menu called ‘Drip Campaigns’, so click on this.
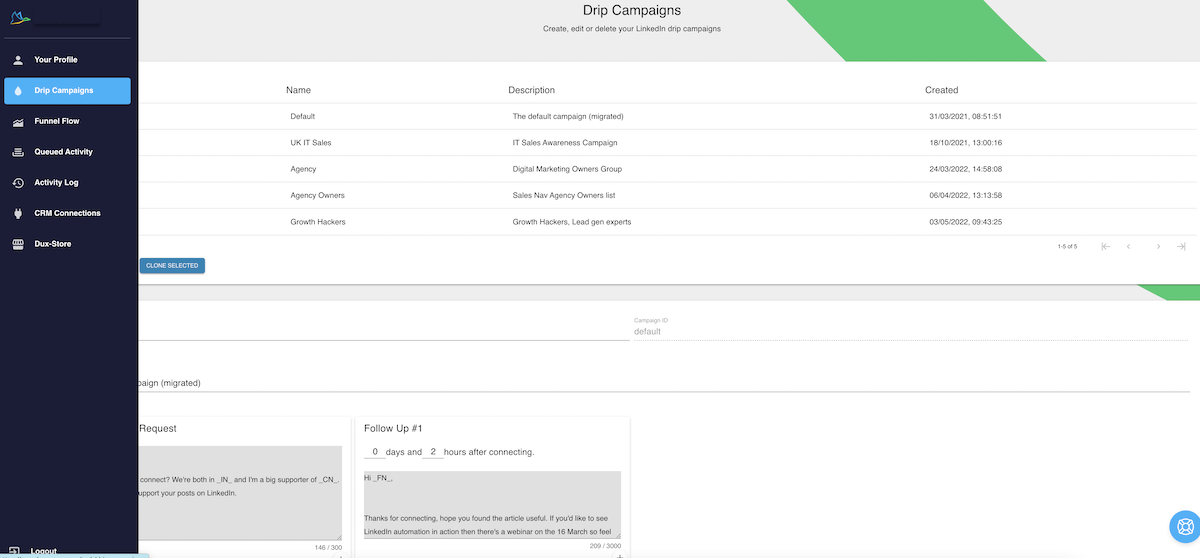
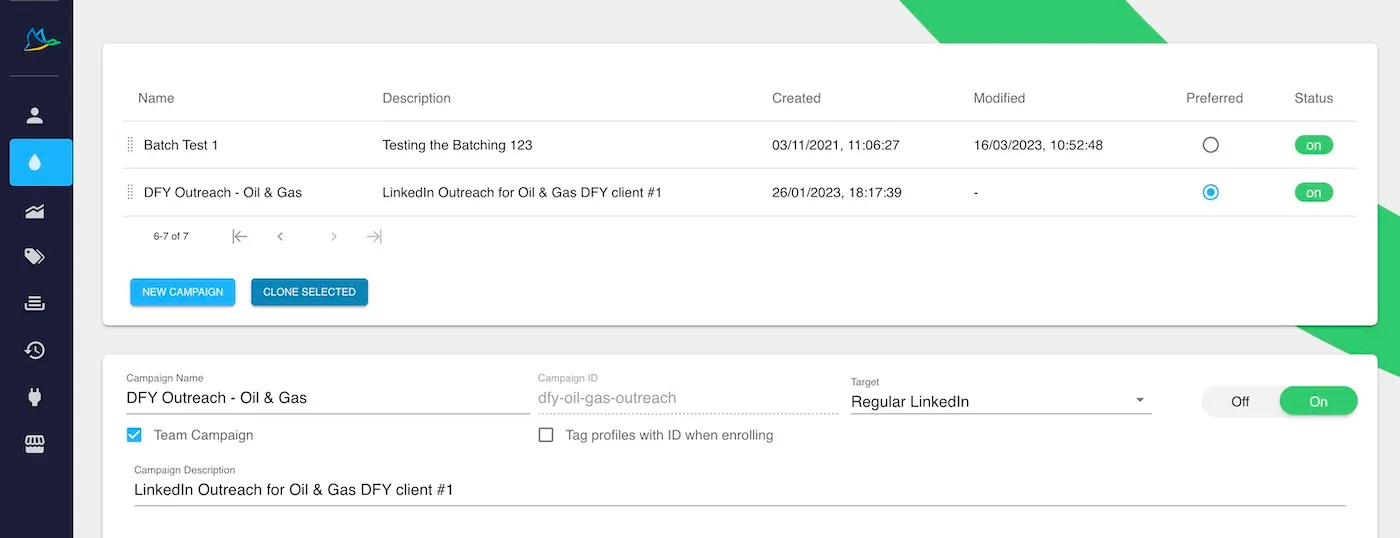
In 'Drip Campaigns', you can create new campaigns, or edit existing campaigns. You can create as many different drip campaigns as you like.
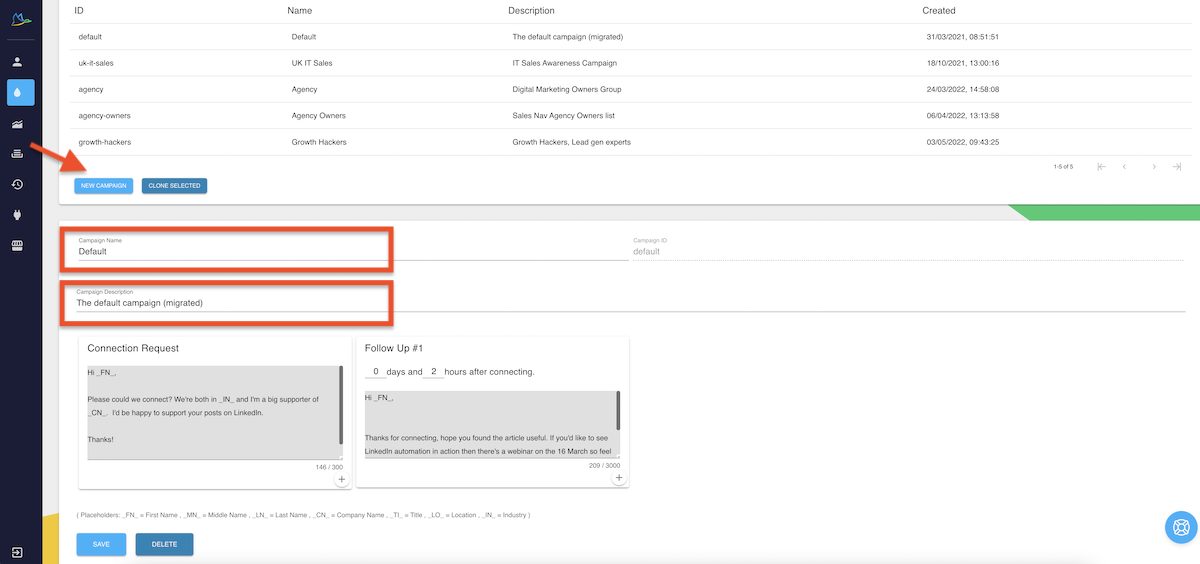
To create a drip campaign, Click on ‘New Campaign’. Name your campaign and add a description.
You can choose to reach out in Regular LinkedIn Sales Navigator or Recruiter, which will keep all messages in your preferred platform.

Tick the box to automatically tag LinkedIn profiles with your campaign ID when enrolling them in campaigns.
Add your connection request message, remembering that LinkedIn has a limit of 300 characters for this. You can personalize this connection message using the _FN_ tag.
Dux-Soup will automatically exclude your connection message when you enroll a first-degree connection to your campaigns.
By clicking on the ‘plus’ icon, you can add up to 11 further actions to your campaign. Choose from Message, Endorse, Visit, InMail and Follow.

You can re-order actions by clicking the handle and dragging the action to the desired location.
Add custom time delays for each action, in days and hours from the previous action.
You can also add personalization tags into your follow-up messages. You have 3000 characters for your messages.
Once you have added all your campaign actions and finished creating your messages, click save.

Editing your campaigns
To edit existing campaigns, click on the name of the campaign, and you can add or remove actions in the same way as above. Delete an action by clicking on the - icon in the bottom right-hand corner of that message.
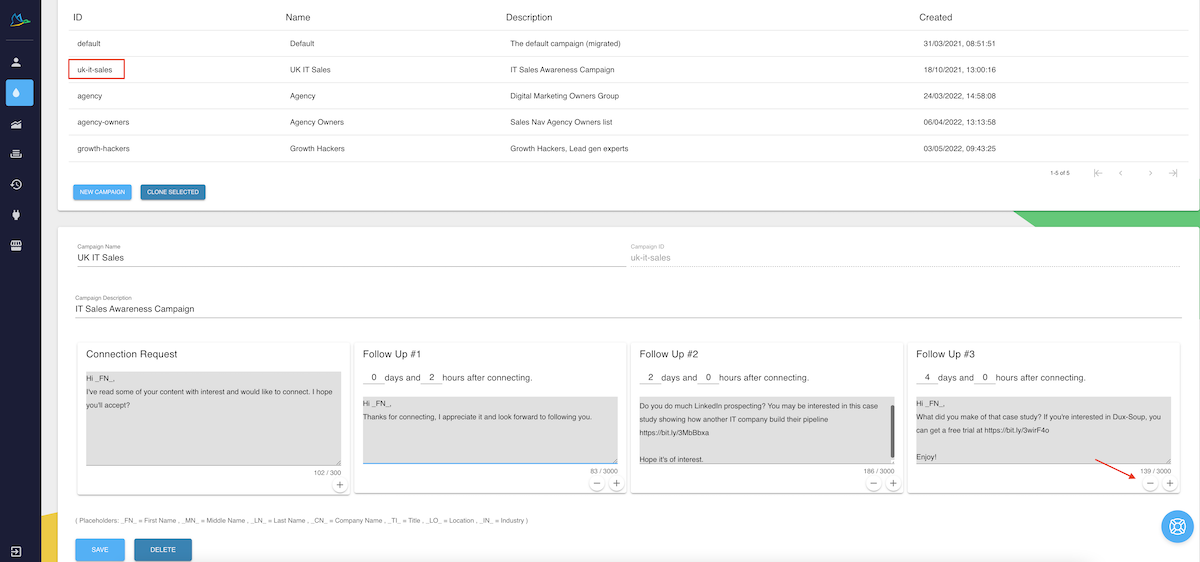
Cloning Campaigns
To save you from having to create each campaign from scratch, you can clone existing campaigns and then edit them, making life much easier and saving time. Just select a campaign and click on 'clone selected'.
Sharing campaigns with your team
If you have a Team license, you can even share your drip campaigns with your team members.
2. Enrolling prospects into campaigns
Watch our Tutorial on How to enroll prospects into campaigns.
Once you’ve set up your campaign in the Dux-Dash, there are 2 ways you can enroll prospects:
Semi-Automatic Enrollment
The semi-automatic method allows you to hand-pick profiles to enroll, making it more targeted.
First, select your target audience in LinkedIn (Standard or Sales Navigator) by running a search to generate your list. If you need guidance on this, you can head to the 8 minute mark of our webinar webinar 'Get Started with Dux-Soup in 5 simple steps'. You can also refer to our article on how to search and filter on LinkedIn.
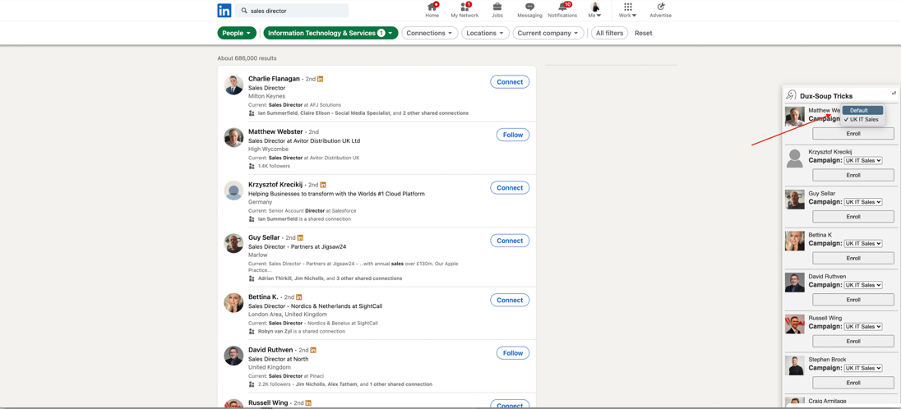
The Dux-Soup Tricks Widget will appear on the right-hand side.
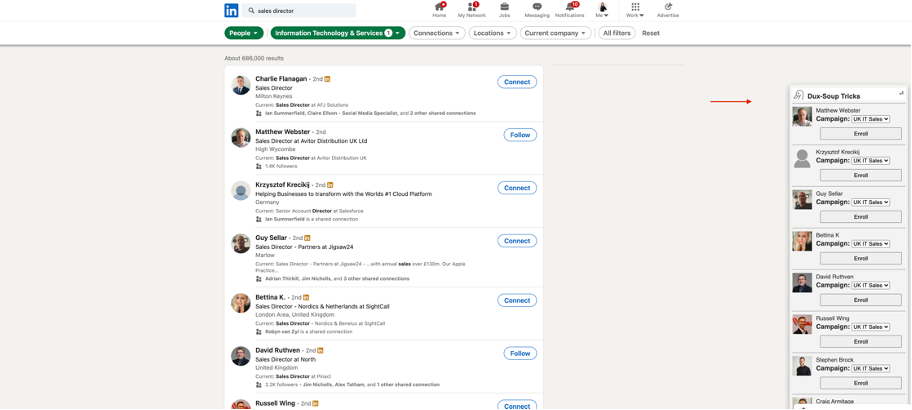
Choose which campaign you want to enroll them into from the drop-down menu and click the 'enroll' button next to their name.
Fully Automated Enrollment
The fully automated method allows you to quickly enroll any list of profiles into a campaign.
Load up any list of profiles that Dux-Soup recognizes. Once your list is ready in LinkedIn or Sales Nav, wait for the Dux-Soup ‘at your service’ message to appear. Open the Dux-Soup menu and click on ‘Enroll’.
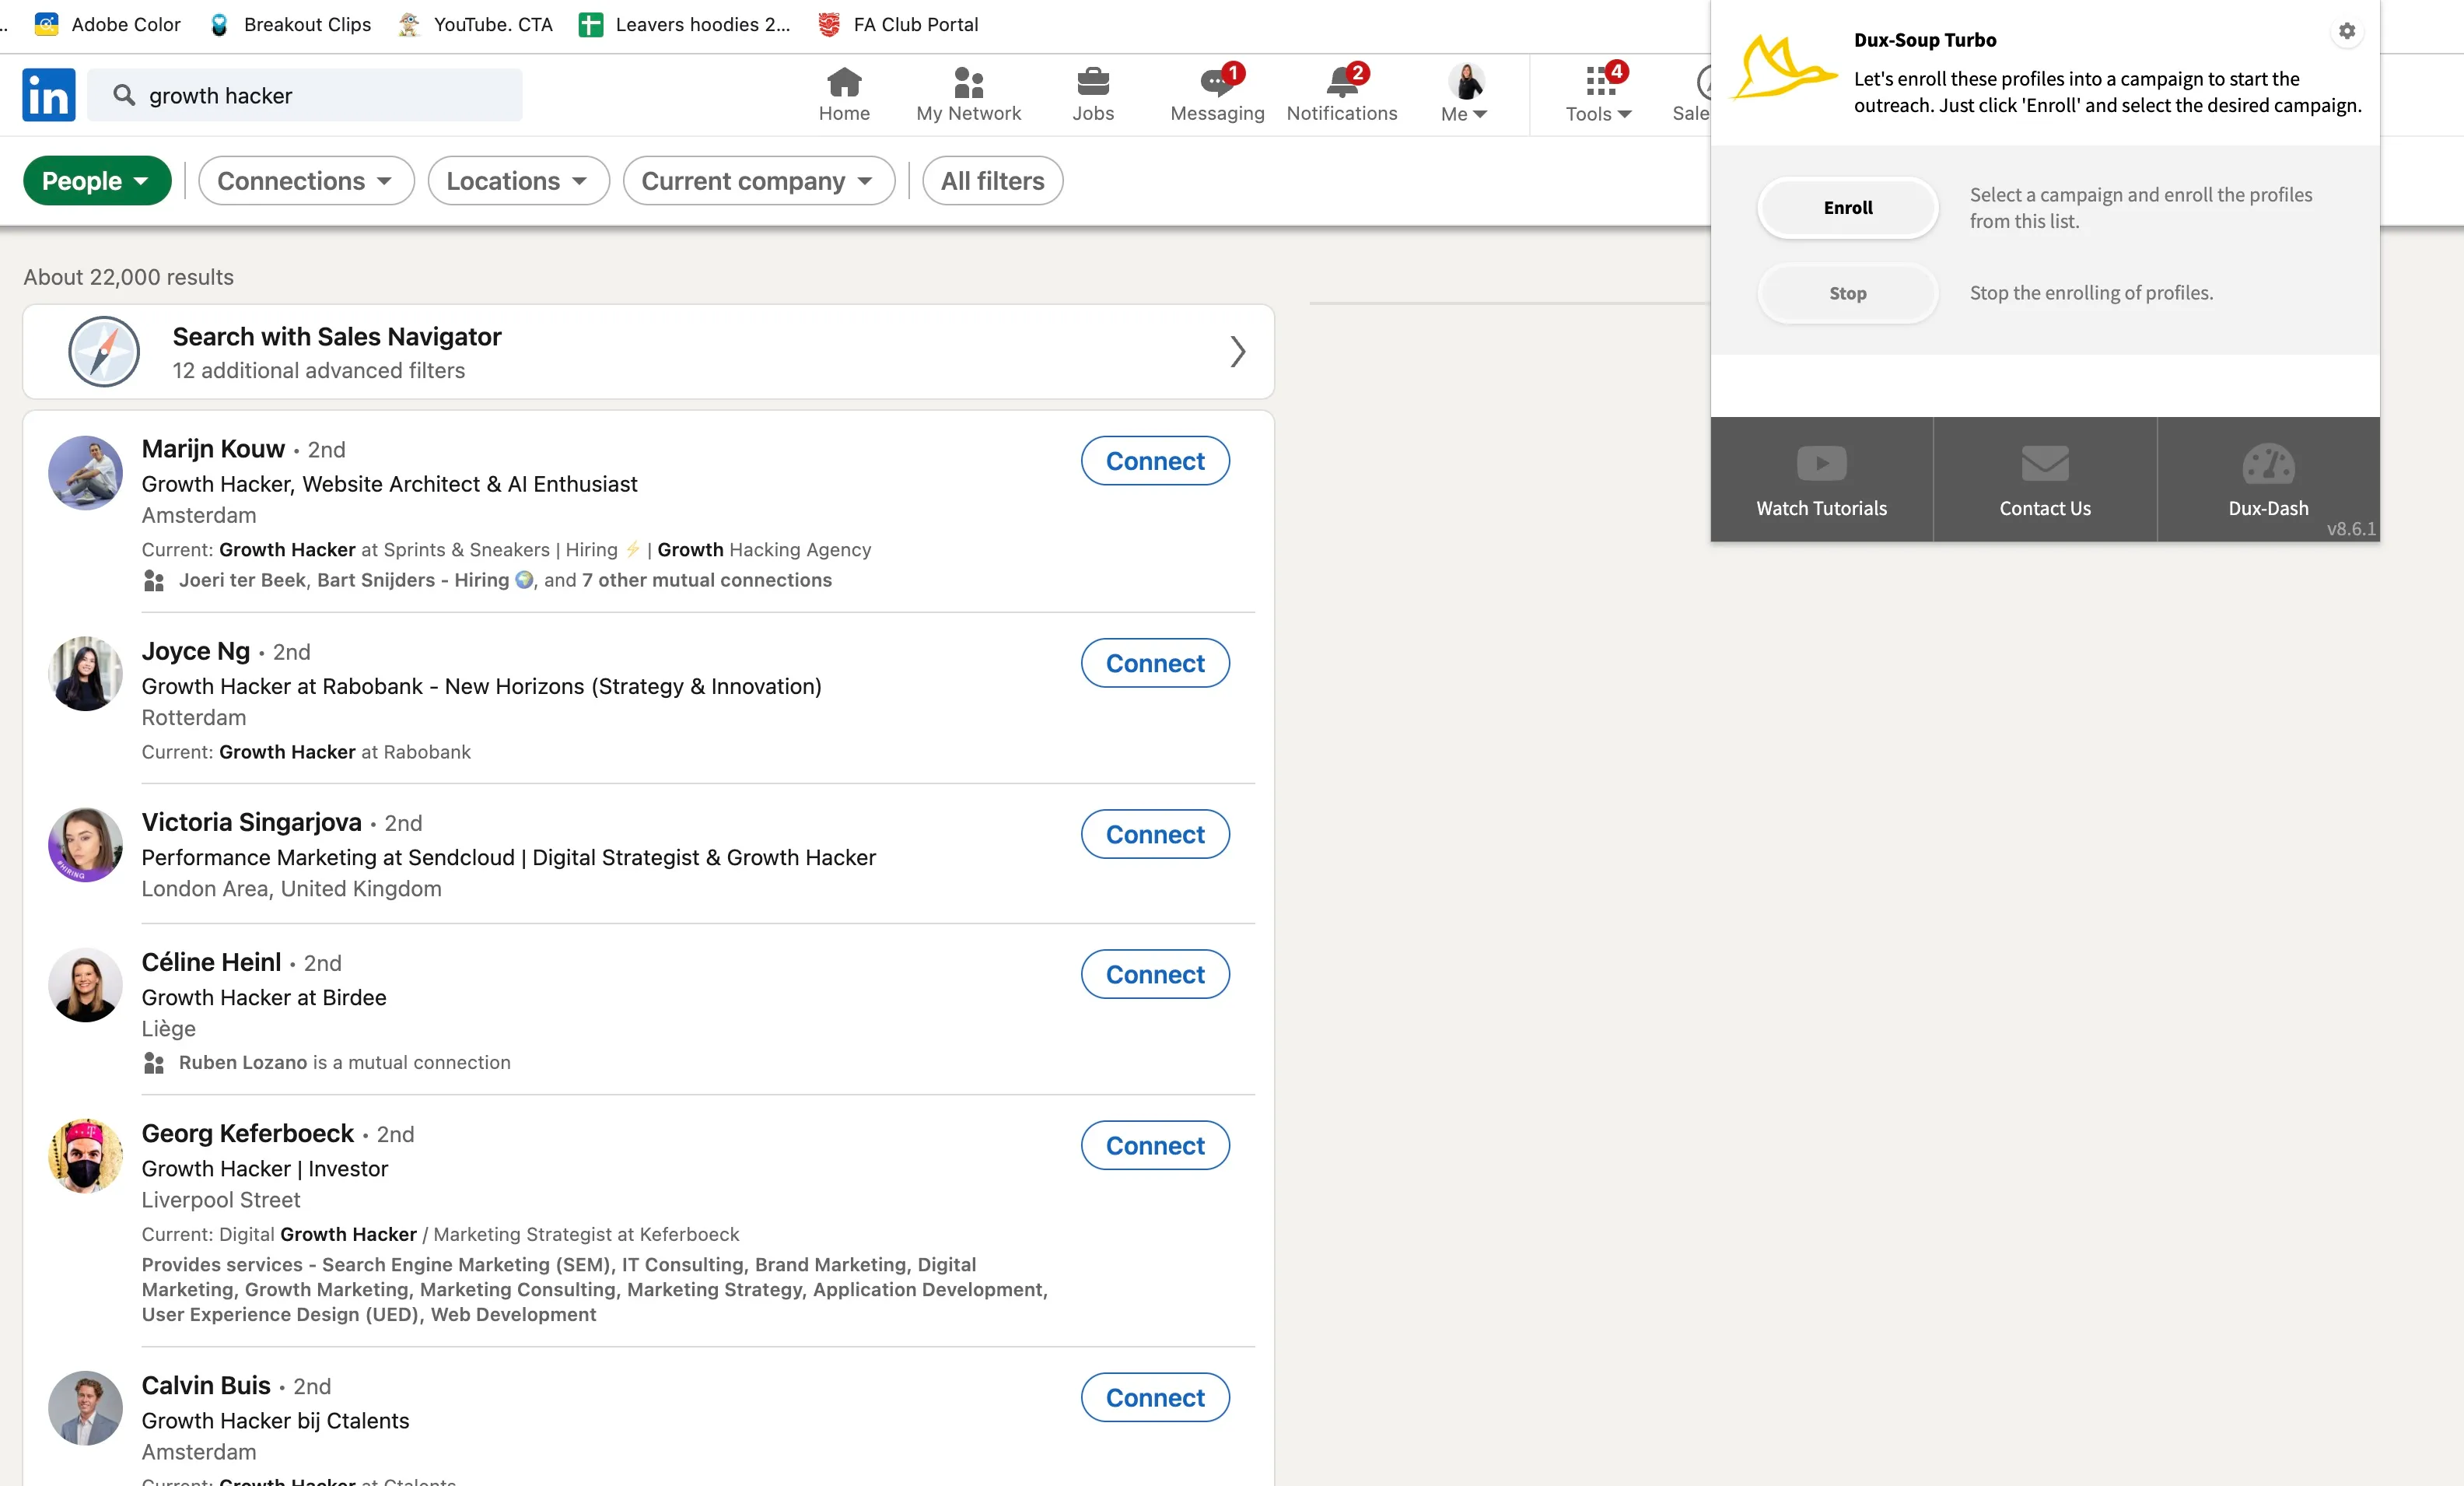
Confirm which campaign you want to enroll your prospects into (your preferred campaign will be pre-selected by default), and click ‘OK’.
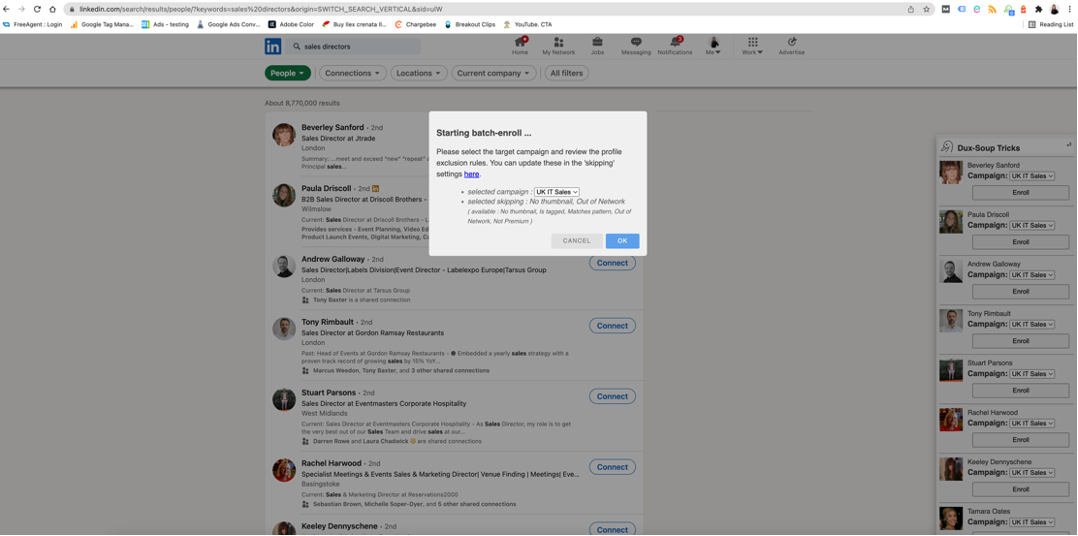
Hey presto, you’re running your first drip campaign!
You should notice that the tags saved against the profiles visited match your campaign name. This means these profiles are enrolled into this campaign and you can easily return to contacts with these tags down the line to identify these lists.
Running additional campaigns
At any time, you can change your drip campaign by selecting a different campaign from the drop-down menu of the extension and repeating the process to another LinkedIn list.
These new contacts will be enrolled into the new campaign, and the drip sequence with automatically run, whilst the tags are updated automatically.
Did your connection requests send?
You can always check in your LinkedIn ‘Manage Invitations’ section to see all connection requests that have been sent to make sure your campaigns are running as expected.
3. Monitoring your Drip Campaigns in the Dux-Dash
Within the Dux Dash, view your conversion rates and dive down into every stage of your lead generation workflow, helping you to understand which campaigns are more effective and which messaging is getting the best results.
To do this, go to the funnel flow option in the left-hand menu of the Dux Dash.

You can define a custom date range, giving you complete flexibility on your analysis period. Drill down into any stage of the sales funnel to see your pipeline at each stage.
From here, you can download your data by clicking on the icon just above your list of contacts. Click into individual contacts to see all past activity for that contact, or go straight to their LinkedIn profile by clicking on the LinkedIn button.
Queued activity
Queued activity can be seen from the left-hand menu of the Dux-Dash, giving you details of the automation activity that is scheduled to run.
Prospects will automatically drop out of drip campaigns if they respond to any messages, but you can reflow individual prospects back into campaigns or manually remove prospects from campaigns as required.
So, there you have it, multiple drip campaigns – each campaign with the potential to automate 1 connection invite and 11 follow-up messages to your prospects. All personalized, all measurable.
How to get multiple, concurrent drip campaigns
In order to take advantage of our multiple drip campaigns feature, you’ll need a Turbo license which is easy to buy and install. Our YouTube channel has a series of tutorials to help you get started. You can also subscribe to our blog to be notified of the latest webinars and LinkedIn hacks as they’re released.
Our Support site (support.dux-soup.com) contains plenty of useful Dux-Soup guidance for users – and the team is always on hand to help at info@dux-soup.com
So, now you’re ready, why not get started today?
Happy Dux-ing!


